Case File Tab User Guide
Introduction
The Case File Tab is the comprehensive workspace for managing all aspects of an individual case file. When you open a case file, you access a tabbed interface with multiple sections, each dedicated to a specific area of case management—from intake information to financial tracking, documents, appointments, and more.
This is where the detailed work on each case happens.
Accessing the Case File Tab
From the Case Files Page
- Navigate to the Case Files page
- Click on a File Number (clickable link in the grid)
- The Case File Tab opens
From My Files Panel
- Click My Files in the navigation
- Click on any file in your open files list
- The Case File Tab opens
From a Task
- In the Tasks page, find a task with a linked case file
- Click the Case File Number link
- The Case File Tab opens
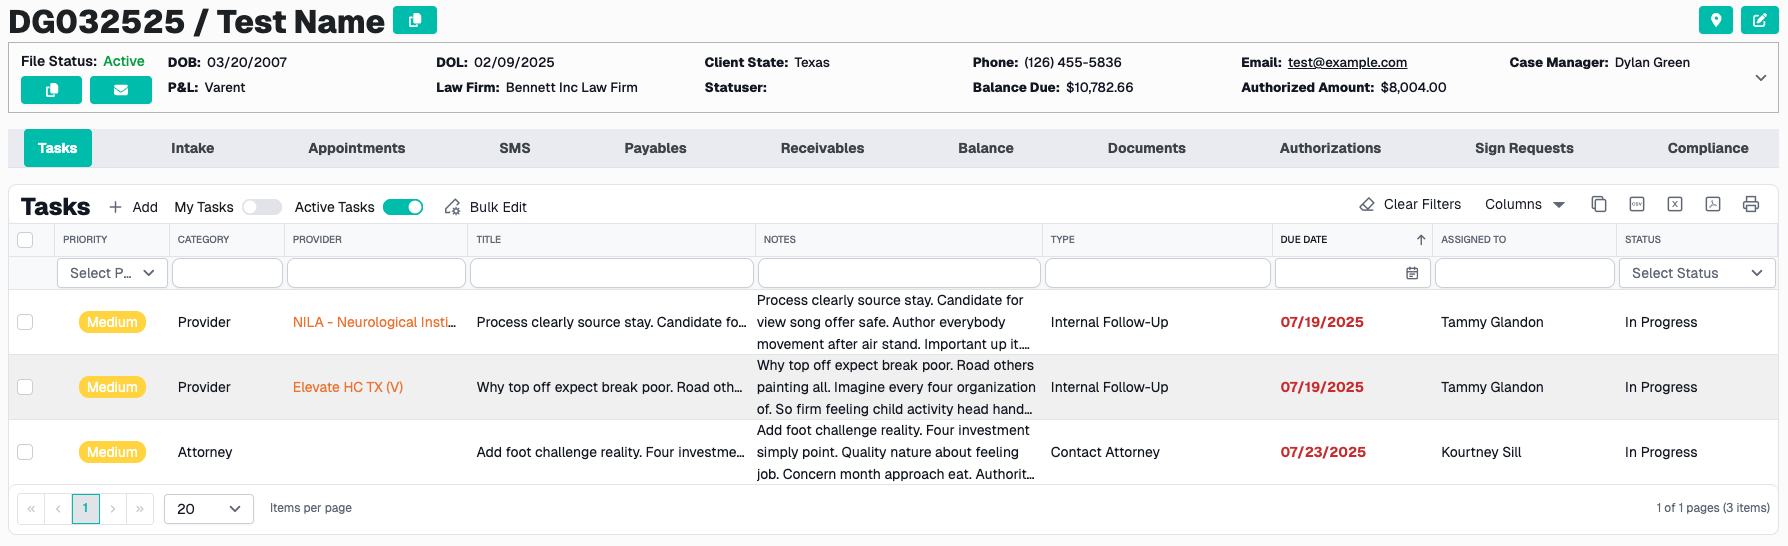
Case File Tab Header
At the top of every Case File Tab, you'll see:
File Information Display
- File Number - The unique case identifier
- Patient Name - Patient's First and Last name
- Comments - Case-specific notes (if entered)
Copy Button: Click the copy icon to copy "File Number / Patient Name" to clipboard
Header Actions
Provider Map Button (Location Pin Icon)
- Visual representation of provider locations
- Helps with appointment planning and provider selection
Edit Case File Button (Pencil Icon)
- Opens the case file edit dialog
- Make changes to case information
- Same form as creating a case file
Case File Details Accordion
Below the header, there's an expandable accordion showing detailed case file information:
Click to expand/collapse the accordion to see:
Patient Information
- Full name, DOB, gender
- Address and contact information
- Primary phone number
- Email address (if available)
Case Information
- Law Firm and contacts
- Case Manager
- Market Manager
- P&L classification
- Date of Loss
- File Opened date
- Statute of Limitations
- Record Status
Treatment Status
- In Treatment (Yes/No)
- Surgical case (Yes/No)

Case File Tab Sections
The Case File Tab contains multiple sections (tabs) for organizing different aspects of the case. Click on any section to view its contents.
Available Sections
- Tasks - Work items and to-dos for this case
- Intake - Injury details, accident information, insurance
- Appointments - Scheduled appointments with providers
- Payables - Invoices and bills to pay
- Receivables - Money owed to the firm
- Balance - Financial summary and balance information
- Documents - Files, records, and documentation
- Authorizations - Treatment authorizations
- Sign Requests - Electronic signature requests (Box Sign)
- SMS - Text message communication with patient
- Compliance - Compliance tracking and requirements
- Surgical - Surgical-specific information (if applicable)
Note: Some sections may not be visible based on your role or case details (e.g., Surgical section only appears for surgical cases).

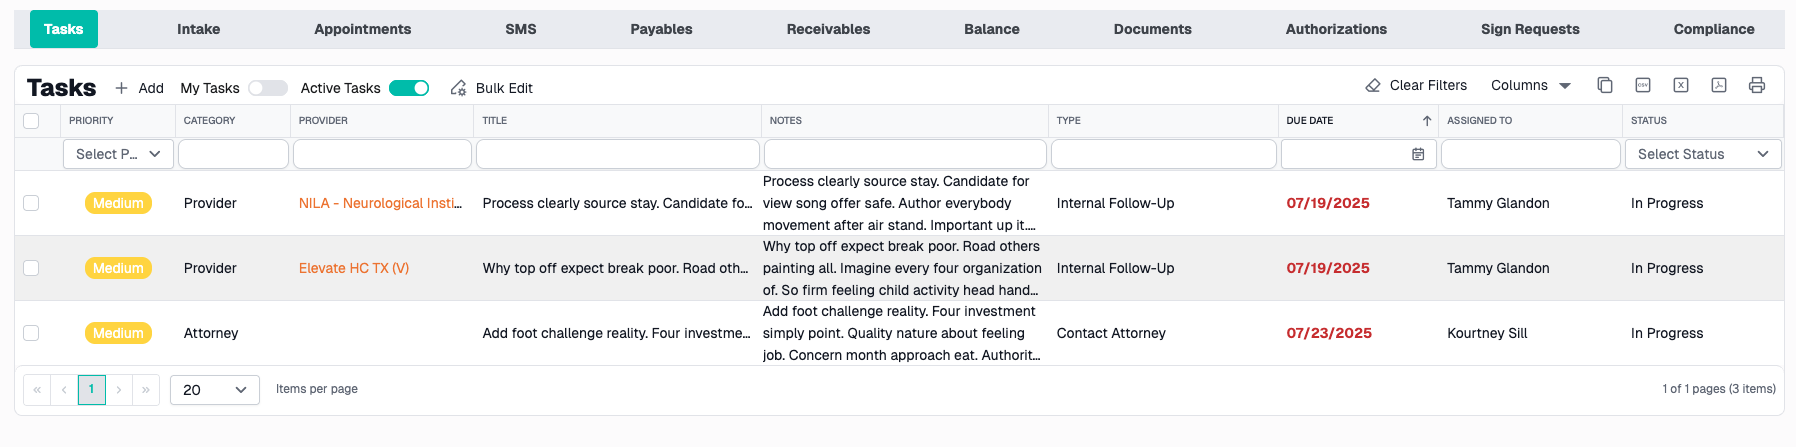
Tasks Section
Purpose: Manage all work items and to-dos specific to this case file
What You'll Find
- Grid of tasks linked to this case
- Same features as the main Tasks page (filtering, sorting, etc.)
- Only shows tasks associated with THIS case file
Key Features
Create Task:
- Click Add button
- Task form opens with case file pre-selected
- Fill in task details
- Submit
View/Edit Task:
- Click any task row to open edit dialog
- Make changes
- Submit to save
Task Grid Features:
- Filter by priority, status, due date
- Sort by any column
- Export to Excel/PDF
- Bulk edit multiple tasks
Toggle: Assigned to Me
- Filter to show only YOUR tasks for this case
Toggle: Active Statuses
- Show only incomplete tasks (default)
- Or show all tasks including completed
Intake Section
Purpose: Capture detailed injury, accident, and insurance information
What You'll Find
The Intake section contains forms for comprehensive case intake information:
Injury Information
Body Parts Injured:
- Select multiple injured body parts
- Categorized by body region
- Required for case setup
Injury Details:
- Nature of injuries
- Severity
- Current status
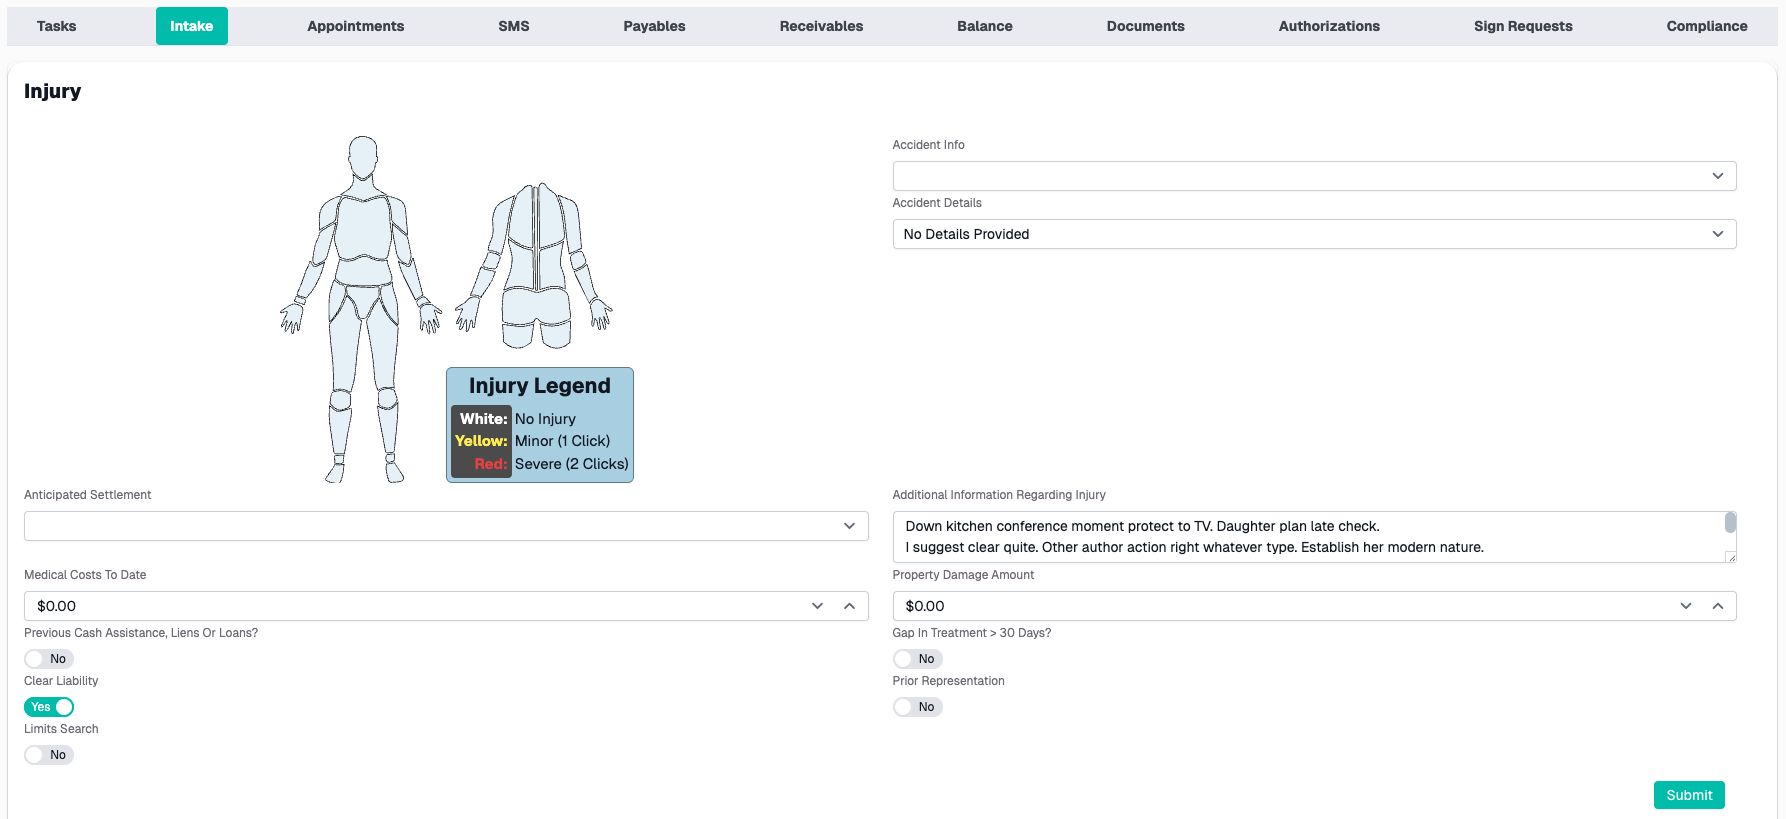
Accident Details
Accident Information:
- Date and time of incident
- Location
- Type of accident (Auto, Slip & Fall, etc.)
- Weather conditions
- Road conditions
Parties Involved:
- Other drivers/parties
- Witnesses
- Police report information
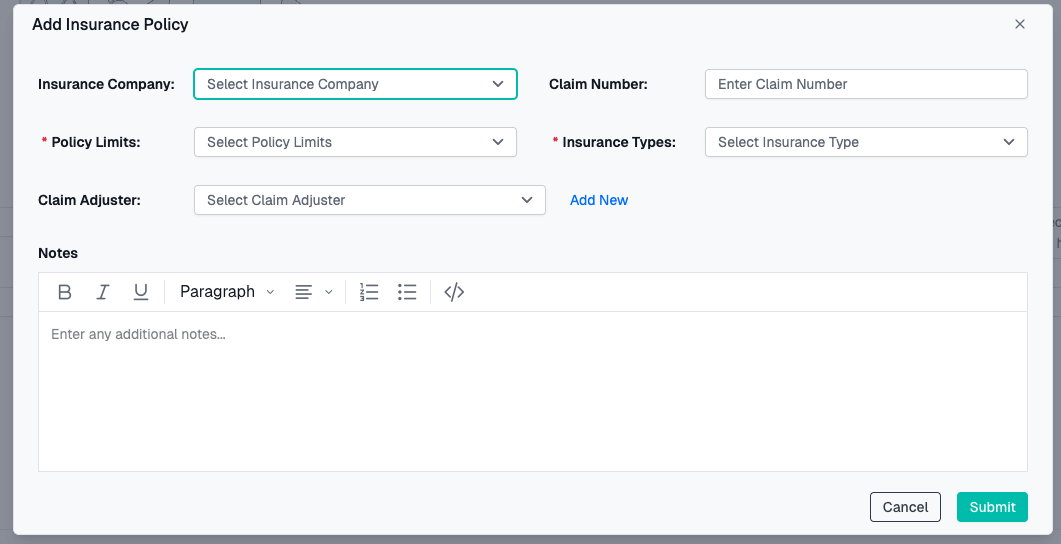
Insurance Information
Add Insurance Companies:
- Click Add Insurance
- Enter insurance company details:
- Insurance company name
- Policy limits
- Claim number
- Adjuster information
- Insurance Type
- Save
How to Complete Intake
- Navigate to the Intake section
- Fill in Injury information first
- Complete Accident Details
- Add Insurance information
Appointments Section
Purpose: Schedule and manage all appointments for this case
What You'll Find
- Calendar view of appointments
- List view of scheduled appointments
- Ability to create new appointments
- Integration with provider information
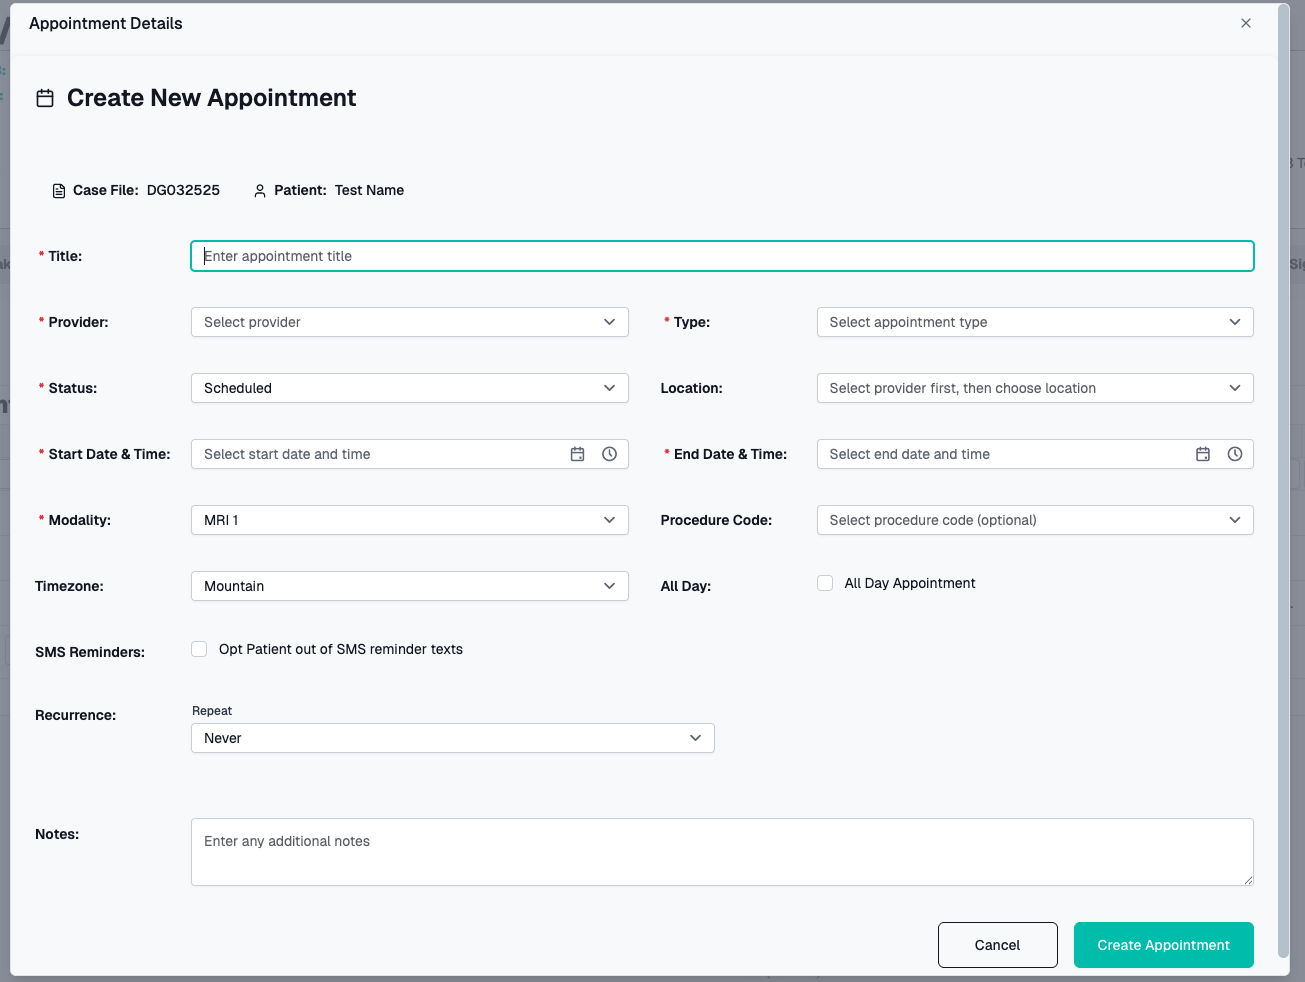
Creating an Appointment
- Click Add Appointment or New Appointment
- Appointment form appears
- Fill in required information:
- Provider - Select from dropdown or search
- Appointment Type - Initial eval, follow-up, etc.
- Date and Time - When appointment occurs
- Location - Auto-fills from provider, can override
- Notes - Additional details
- Click Submit
Calendar View
Visual appointment display:
- Color-coded by appointment type
- Click any appointment to view details
- Month, week, workweek, day, and agenda views
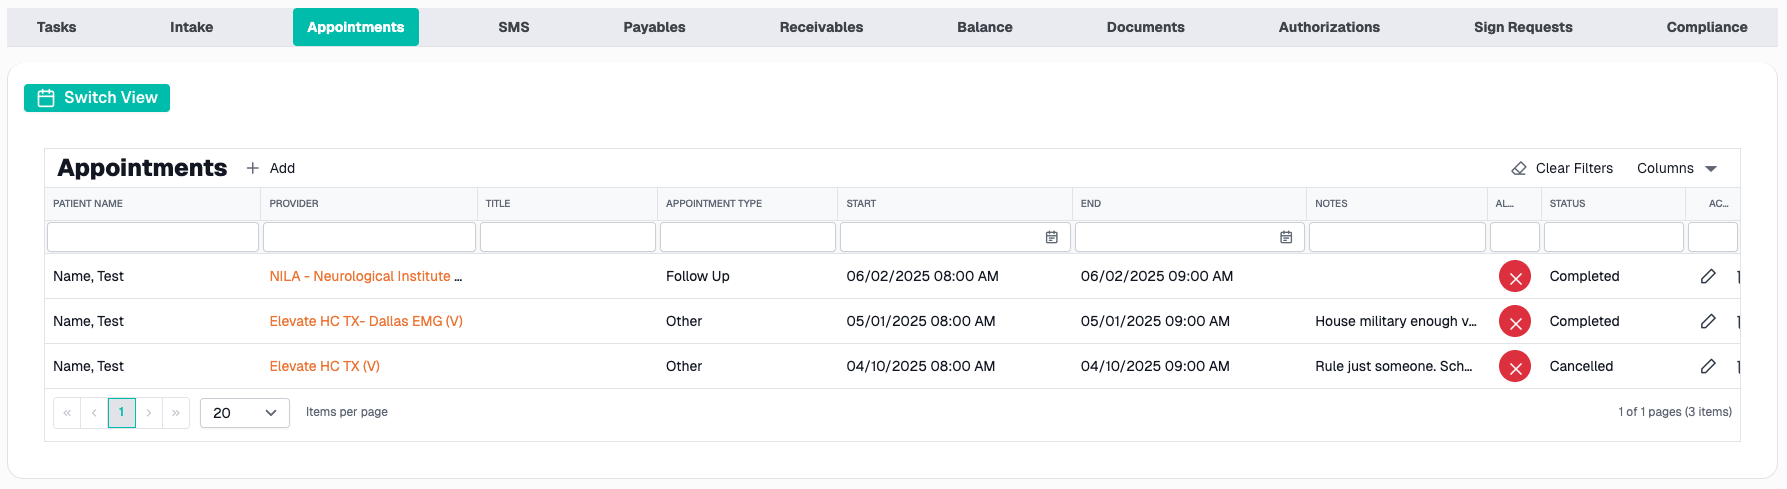
List View
Tabular appointment list:
- Sort by date, provider, type
- Filter by date range or provider
- Quick access to appointment details
- Export to Excel/PDF
Appointment Actions
Edit Appointment:
- Click appointment in calendar or list
- Edit dialog opens
- Make changes
- Save
Cancel/Delete Appointment:
- Open appointment
- Click Cancel or Delete
- Confirm action
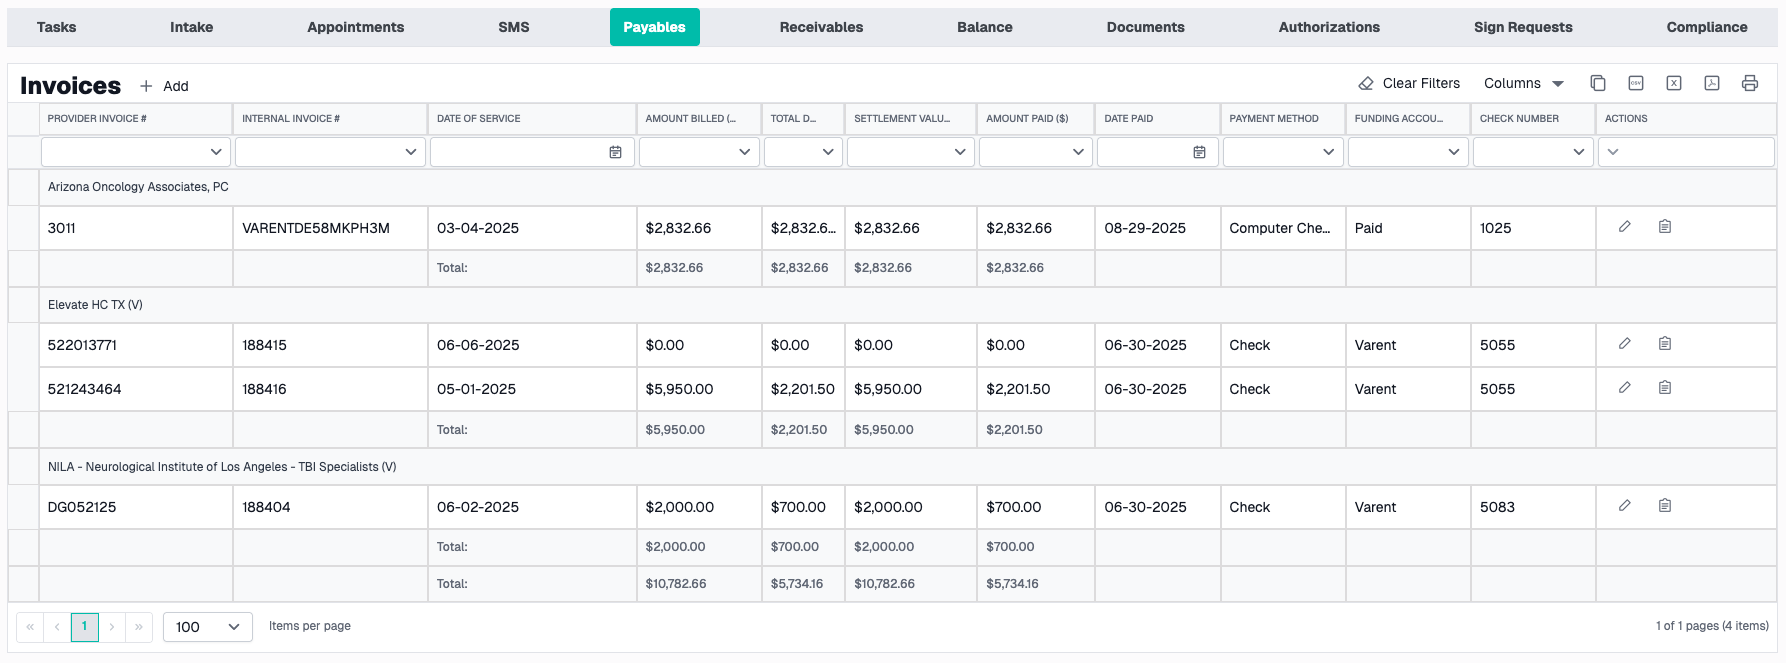
Payables Section
Purpose: Track and manage all bills and invoices to be paid for this case
What You'll Find
- Grid of invoices and bills
- Provider billing information
- Payment tracking
- Outstanding balances
Invoice Grid
Columns:
- Provider name
- Invoice date
- Invoice number
- Service date(s)
- Amount
- Amount paid
- Balance due
- Status (Pending, Paid, Disputed, etc.)
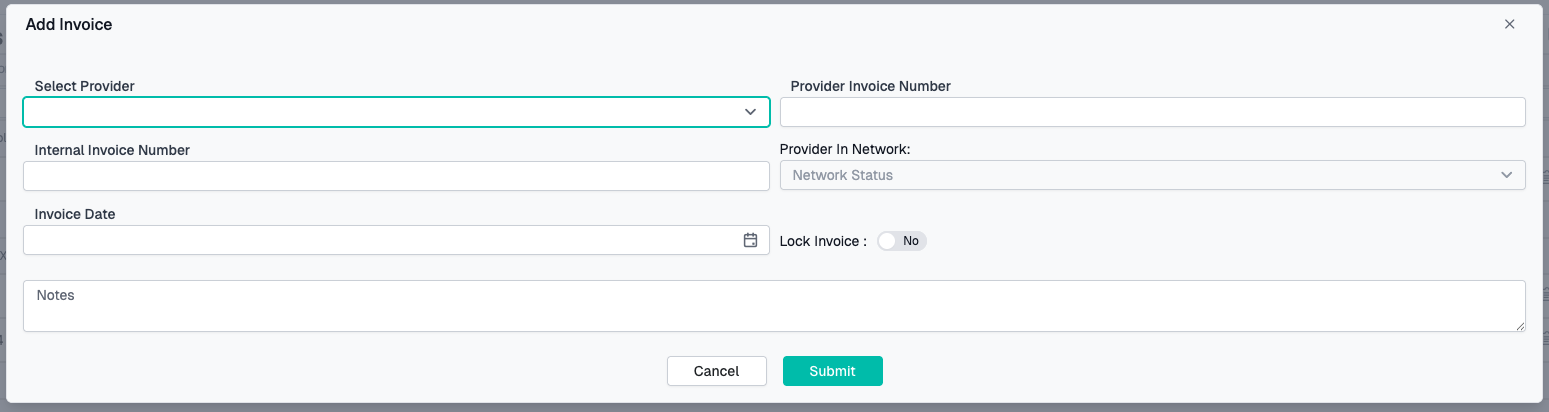
Adding an Invoice
- Click Add Invoice
- Fill in invoice details:
- Provider
- Provider Invoice number
- Internal Invoice number
- Invoice date
- Amount
- Notes
- Submit
Managing Invoices
Filters:
- By provider
- By status (Paid, Unpaid, Overdue)
- By date range
- By amount
Export:
- Excel export of invoice list
- PDF report generation
- Customizable columns
Receivables Section
Purpose: Track money owed to your firm from various sources
What You'll Find
- Payments received
- Estimated Settlement Cost
- Payment history
Deposits Grid
Columns:
- Date received
- Deposit To Account
- Final Check
- Funder Deposit
- Amount of Payment
- Notes
Recording Deposits
- Click Add
- Enter details:
Balance Section
Purpose: View Balance Due Statments for the case
What You'll See
Balance Due Statments Grid:
- Generated Date
- Created By
- Sent At
- Sent To
- Email Status
- Attention
- Total Balance Due
- Final

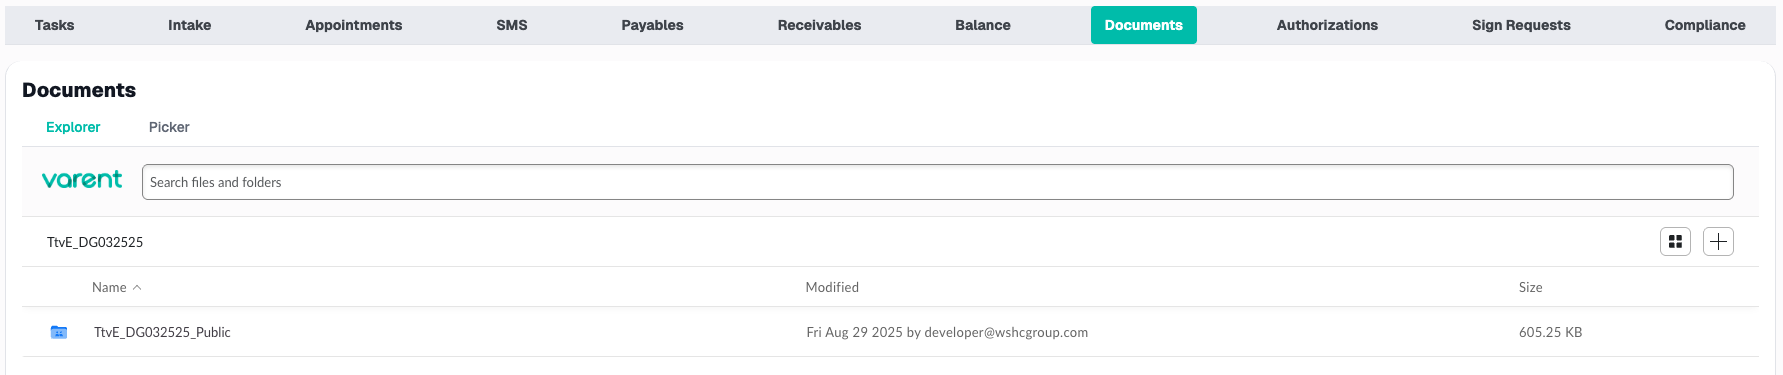
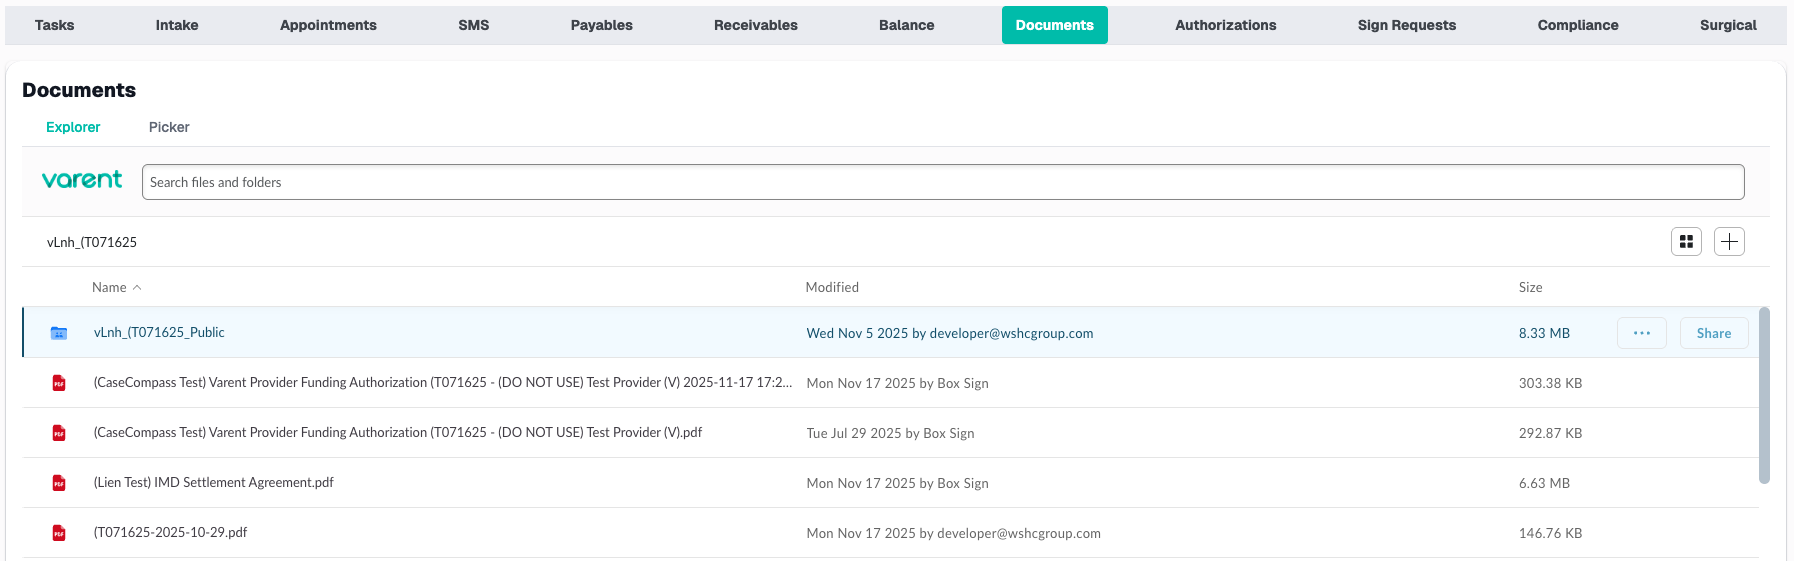
Documents Section
Purpose: Store, organize, and manage all case-related documents
What You'll Find
- Document library with folders
- Upload functionality
- Document preview
- Search and filter
File Structure
- Public Folder
- Balance Statement
- Public Uploads
Uploading Documents
- Click + (Add) button
- Select file from computer
- Choose destination folder
- Upload
Document Actions
View Document:
- Click document name
- Preview opens
Download Document:
- Click download icon
- File saves to your computer
Delete Document:
- Click ... Icon
- Click Delete
- Confirm in Dialog
- Document moved to trash
Search Documents
Search box at top:
- Search by filename
- Search by description
- Filter by document type
- Filter by date uploaded
Authorizations Section
Purpose: Manage and track treatment authorizations
What You'll Find
- Grid of Authorizations
- Grid of Provider Funding
Authorization Grid
Columns:
- Signed Date
- Amount
- Type
- Notes
- Created By
Creating Authorization Request
- Click Update Authorization Amount
- Fill in details:
- Date Signed
- New total Authorized Amount
- Submit request
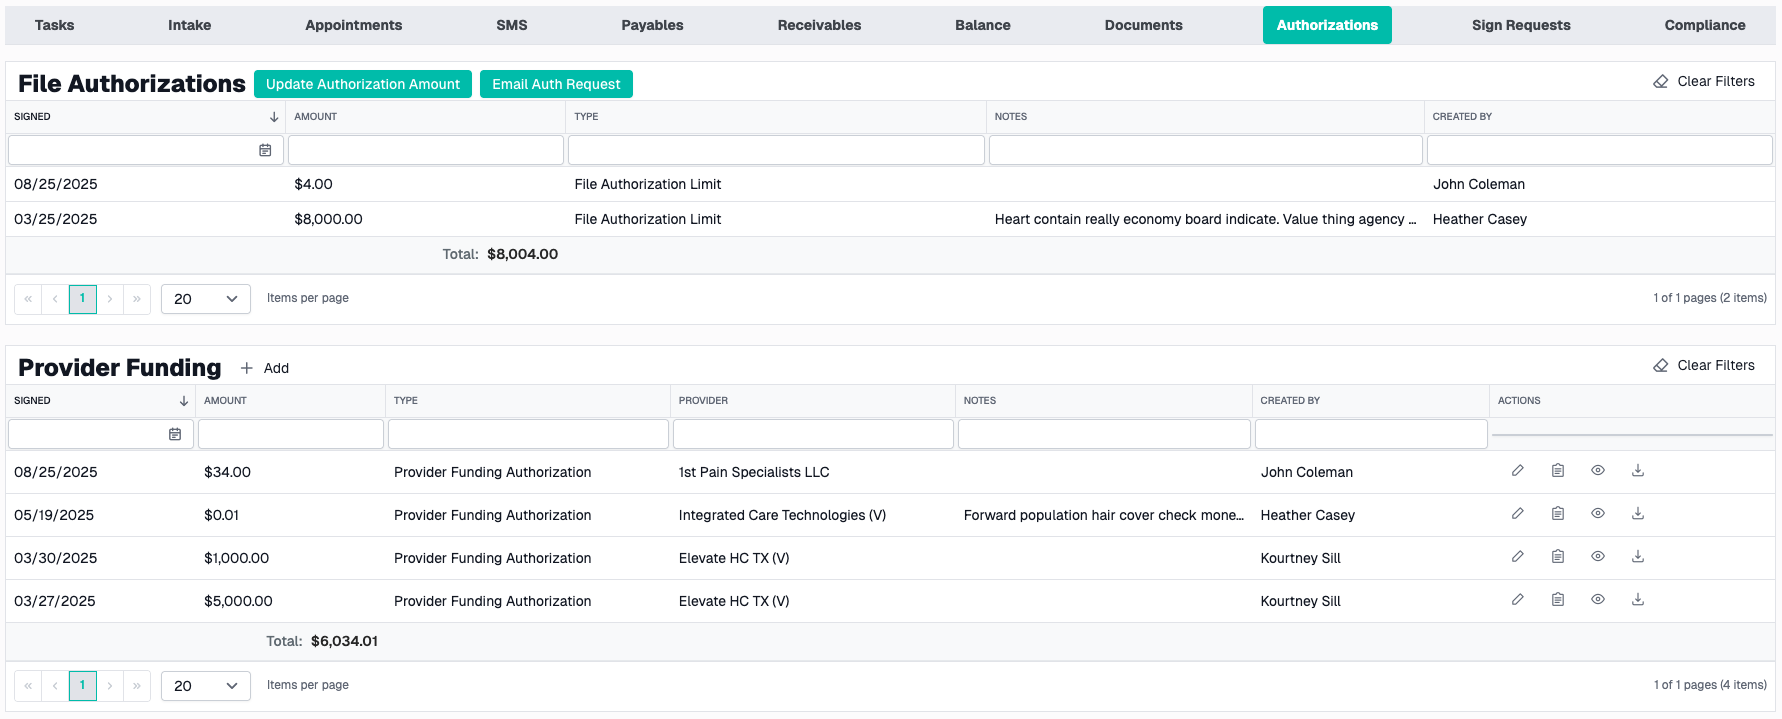
Provider Funding Grid
Columns:
- Signed Date
- Amount
- Type
- Provider
- Notes
- Created By
Creating Provider Funding
- Click + Add
- Fill in details:
- Date Signed
- Amount
- Select Provider
- Submit request
Sign Requests Section
Purpose: Manage electronic signature requests
Creating a Sign Request
- Select Sign Template
- Enter Email Subject
- Enter Email
- Verify Template Fields
- Fill in any missing or relevant information
- Click Send Button
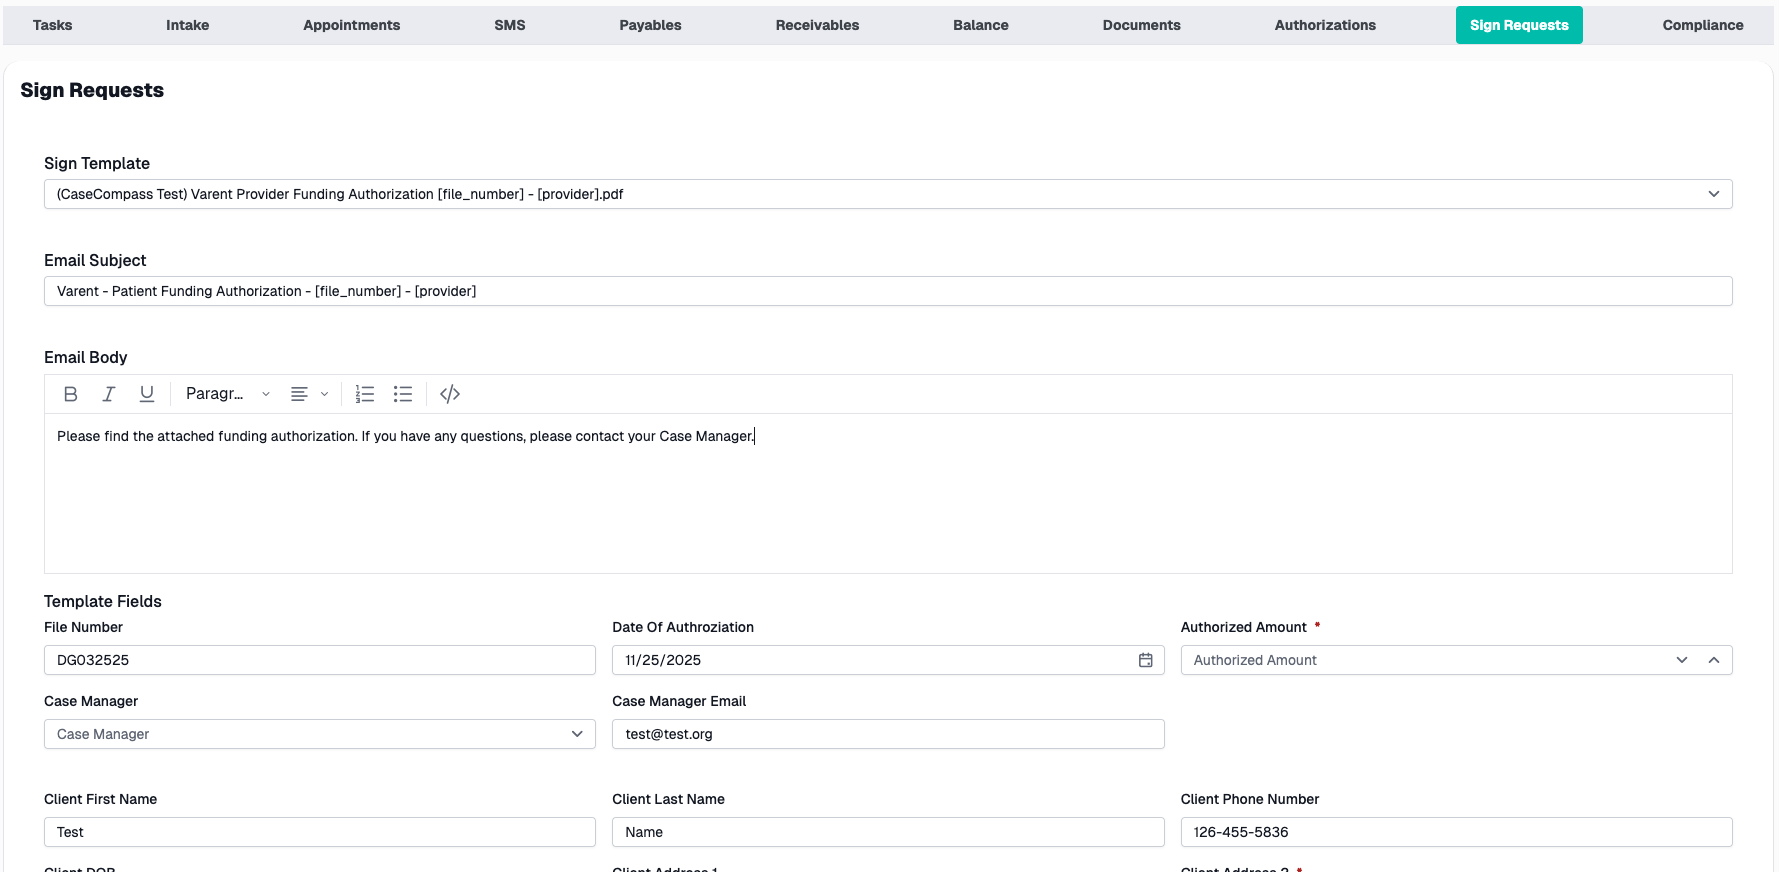
Sign Request Actions
View Status:
- Click request to see details
- See who has signed
- See who is pending
SMS Section
Purpose: Send and receive text messages with the patient directly from the case file
What You'll Find
- Chat-style conversation view with the patient
- Message templates for common communications
- Phone number selector (for patients with multiple numbers)
- Search functionality to find specific messages
- Message delivery status tracking
SMS Header
The header displays key information about the conversation:
Patient Information:
- Patient's full name
- Currently selected phone number
Phone Number Selector:
- If the patient has multiple phone numbers on file, a dropdown appears
- Select which phone number to view/send messages to
Message Count:
- Shows total number of messages in the conversation
- When searching, shows matching count (e.g., "5 of 23 messages")
Search Box:
- Type to search through message content
- Use arrow buttons to navigate between matches
- Click X to clear search
Viewing Conversation History
Messages are displayed in a chat-style interface:
Outbound Messages (Sent by CaseCompass):
- Appear on the right side
- Teal/turquoise colored bubbles
- Show delivery status below the message
Inbound Messages (From Patient):
- Appear on the left side
- White colored bubbles
Date Dividers:
- Messages are grouped by date
- A date divider appears between messages from different days
- Format: "November 18, 2024"
Message Timestamps:
- Each message shows when it was sent
- Recent messages show relative time (e.g., "2h ago", "Just now")
- Older messages show the date
Understanding Message Status
Outbound messages display delivery status:
| Status | Indicator | Meaning |
|---|---|---|
| Sent | ✓ | Message sent to carrier |
| Failed | Red bubble with "Failed to send" | System could not send message |
| Undelivered | Orange bubble with "Not delivered" | Carrier could not deliver |
Note: Failed and undelivered messages are color-coded for easy identification:
- Failed - Red background (system error)
- Undelivered - Orange background (carrier issue)
Searching Messages
To find specific messages in the conversation:
- Type your search term in the Search messages... box
- Matching messages are highlighted in yellow
- The currently focused match is highlighted in orange
- Use the Up/Down arrow buttons to navigate between matches
- The header shows "X of Y messages" when searching
- Click the X button to clear the search
Sending a Message
Compose a New Message:
- Click in the message input area at the bottom
- Type your message (up to 1600 characters)
- Character count displays below the input
- Click Send or press Enter to send
Quick Actions:
- Enter key - Send the message
- Shift + Enter - Add a new line
- Clear button - Clear the message without sending
Using Templates
Templates provide pre-written messages for common scenarios:
Selecting a Template:
- Click the Templates button
- A dropdown appears with available templates
- Each template shows:
- Template name
- Preview of the message content
- Click a template to select it
Template Placeholders:
Templates may contain placeholders that are automatically filled:
| Placeholder | Replaced With |
|---|---|
| [Name] | Patient's first name |
| [CompanyName] | Your company name |
| [CompanyPhone] | Company phone number |
| [CaseManagerName] | Current user's name |
| [AccidentType] | Case type (e.g., "Auto") |
| [AccidentDate] | Date of loss |
Manual Placeholders:
Some placeholders require you to fill in the information:
- [Fill in Date Here]
- [Fill in Time Here]
- [Fill in Provider Here]
- [Fill in Address Here]
After selecting a template, review and edit the message as needed before sending.
Switching Phone Numbers
If the patient has multiple phone numbers:
- Look for the Conversation with: dropdown in the header
- Click the dropdown to see all available numbers
- Each option shows:
- Phone number formatted as (XXX) XXX-XXXX
- "(Primary)" label if it's the main number
- Phone type (Mobile, Home, Work)
- Select a different number to view that conversation
- Messages are specific to each phone number
Note: If the patient only has one phone number, the dropdown is replaced with a simple display of the number.
Auto-Refresh
The SMS tab automatically refreshes every 30 seconds to show new messages. If you're scrolled to the bottom of the conversation, new messages will automatically appear. If you've scrolled up to view older messages, the view won't jump—you'll stay where you are.
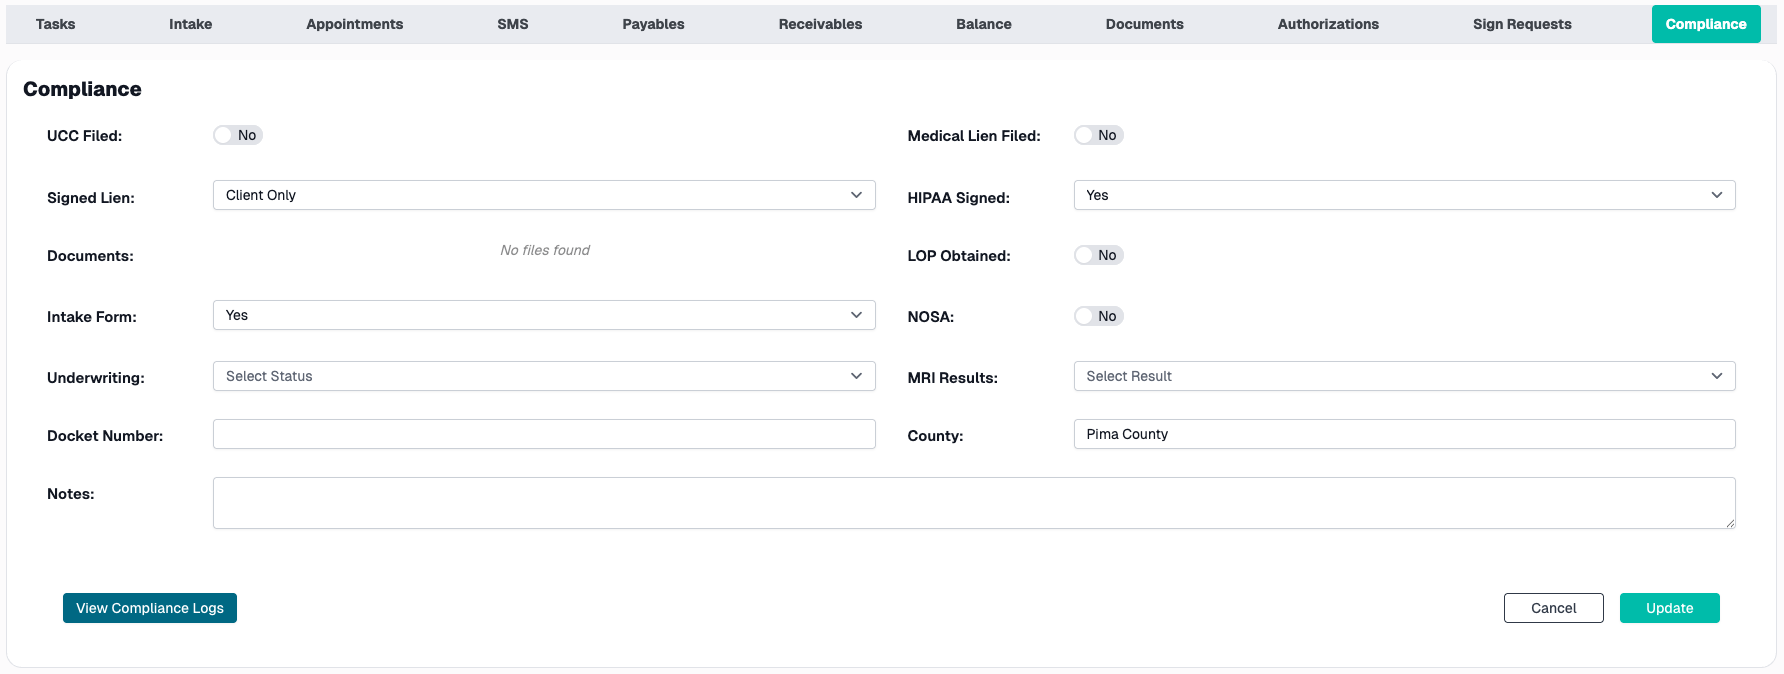
Compliance Section
Purpose: Track compliance requirements and deadlines
What You'll Find
- Compliance checklist
- Deadline tracking
- Documentation requirements
- Status indicators
Compliance Items
- UCC Filed?
- UCC Document
- Signed Lien?
- Signed Lien Document(s)
- Intake Form
- Underwriting
- Docket Number
- Medical Lien Filed?
- HIPAA Signed?
- LOP Obtained?
- NOSA?
- MRI Results
- County
- Notes
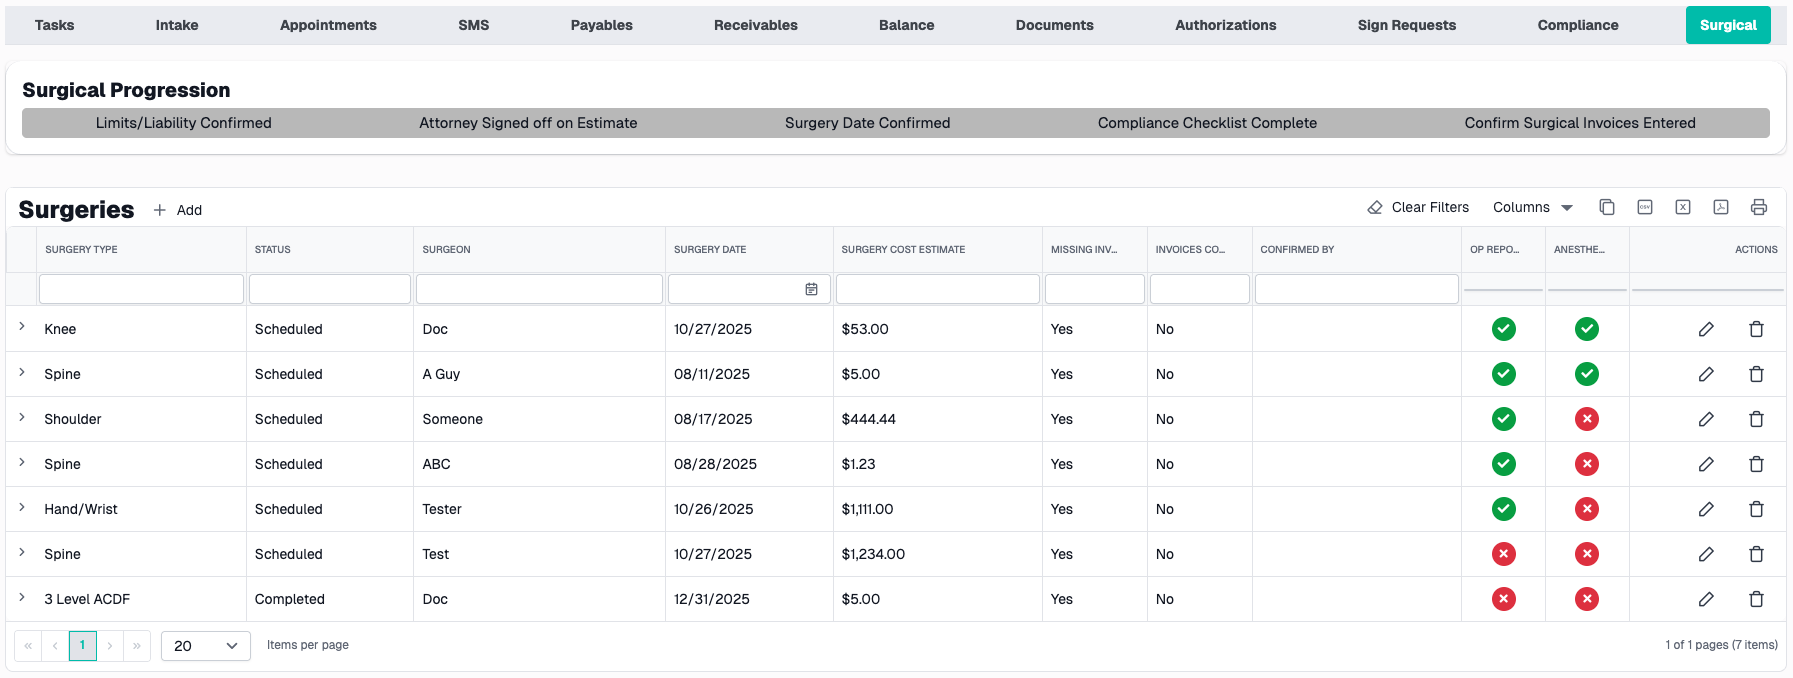
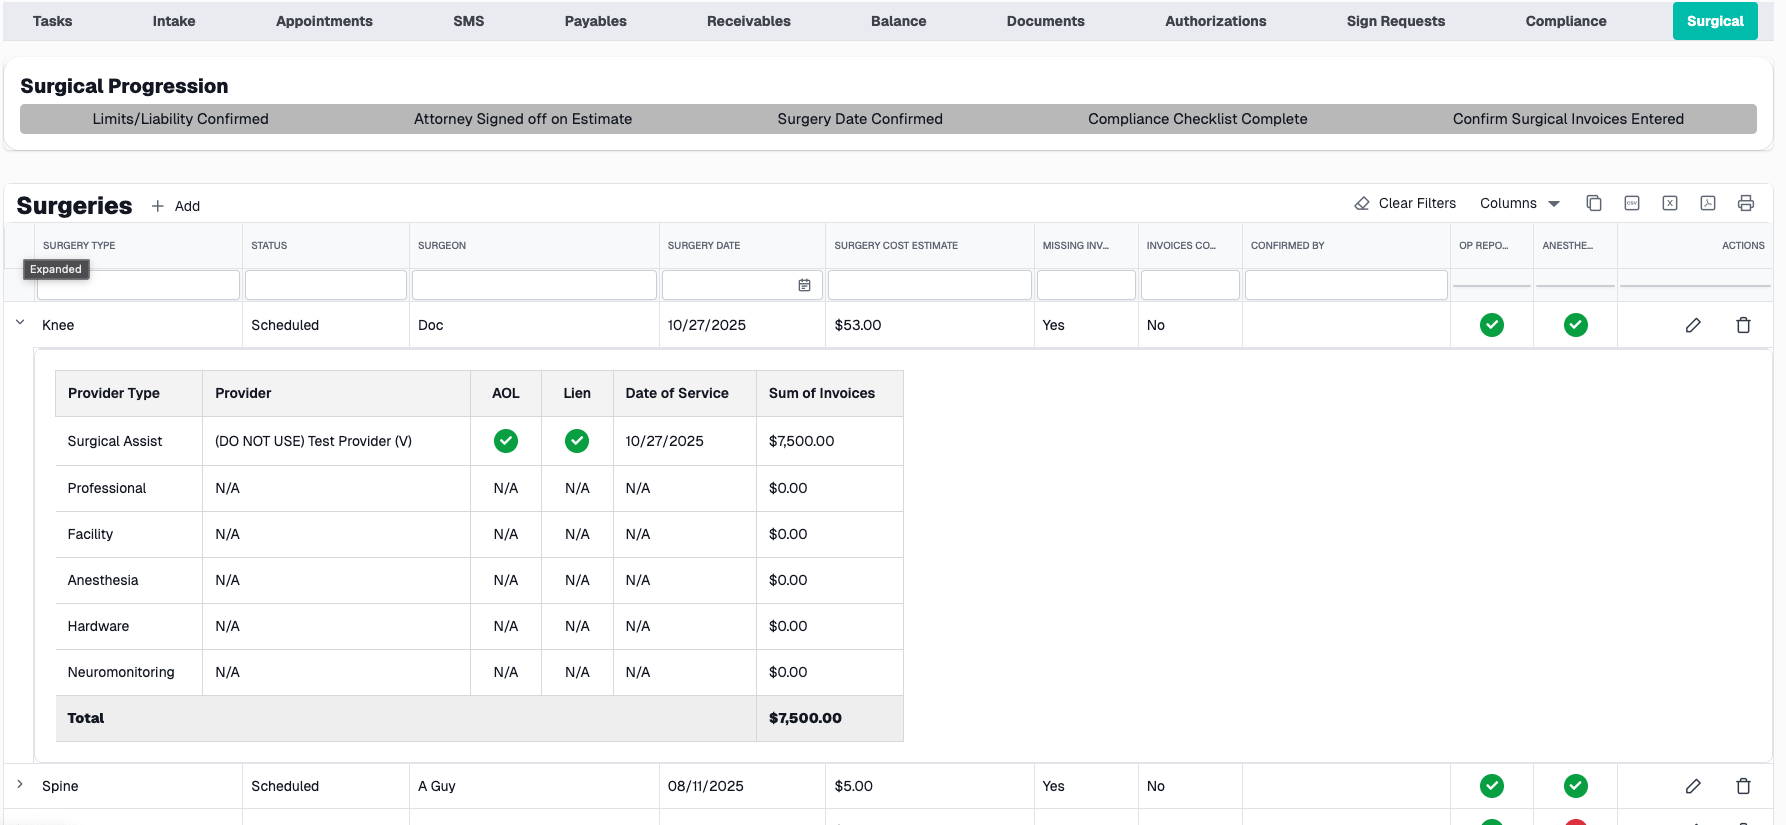
Surgical Section
Visibility: Only appears for cases marked as "Surgical"
Purpose: Track surgical-specific information and requirements
Surgical Information
Surgeries Grid:
- Type of surgery
- Surgery Provider
- Surgery Date
- Surgery Cost Estimate
- Missing Invoices?
- Invoices Confirmed
- Confirmed By
Surgery Details:
- Provider Type
- Provider
- AOL?
- Lien?
- Date of Service
- Sum of Invoices
Section Navigation
Switching Between Sections
Click any section tab at the top to switch views:
- Changes content area below
- Tab highlights to show current section
- Browser URL updates with section name (bookmark-able!)
URL Bookmarking
Each section has a unique URL you can bookmark:
- Example:
case-files/hub?fileNumber=12345#Appointments - Share links to specific sections with colleagues
- Return directly to a section later
Common Workflows
Reviewing a New Case
- Open case file from Case Files page
- Review Intake section for injury details
- Check Documents for uploaded records
- Create Tasks for follow-ups if none exist
- Schedule Appointments if ready
Daily Case Management
- Start with Tasks section
- Review due and overdue items
- Check Appointments for the day
- Update Payables with new invoices
- Upload new Documents as received
- Mark Compliance items complete as appropriate
Managing Provider Appointments
- Open Appointments section
- Check upcoming schedule
- Call Provider Map to see locations
- Create new appointments as needed
- Create follow-up Tasks after appointments as needed
Tips & Best Practices
Staying Organized
✅ Use sections consistently - Put information in the right section
✅ Keep documents organized - Use folder structure in Documents
✅ Update regularly - Don't let tasks or invoices pile up
✅ Check compliance - Review compliance section weekly
✅ Link related items - Connect tasks to appointments, providers, etc.
Team Collaboration
✅ Assign tasks clearly - Use the Tasks section for accountability
✅ Add detailed notes - Help teammates understand context
✅ Keep status current - Update statuses so others know where things stand
✅ Use sign requests - Better than printing/scanning
Role-Based Access
Standard User
Access to:
- Tasks
- Intake
- Appointments
- Documents
- Authorizations
- Sign Requests
- Compliance
- Surgical (if applicable)
Lawyer Role
Limited access to:
- Intake
- Appointments
- Documents
- Balance
Not visible: Tasks, Payables, Receivables, Authorizations, Sign Requests, Compliance
Troubleshooting
Section Not Appearing
Possible Causes:
- You don't have permission for that section
- Section is role-restricted (e.g., Payables, Surgical)
- Case file doesn't meet criteria (e.g., Surgical section requires IsSurgical = true)
Solution:
- Check with CaseCompass Support about permissions
- Verify case file settings
Cannot Edit Case File
Possible Causes:
- Case file is closed/archived
- You don't have edit permissions
Solution:
- Check case status
- Verify your permissions
Section Loads Slowly
Common for:
- Documents section (many files)
- Financial sections (many invoices)
- Tasks section (many tasks)
Solution:
- Use filters to narrow results
- Close other browser tabs
- Check internet connection
Data Not Appearing
Possible Causes:
- No data entered yet
- Filters hiding data
- Permission restrictions
Solution:
- Check if section has been completed
- Clear any active filters
- Verify permissions
Need Help?
If you encounter issues not covered in this guide:
- Contact CaseCompass support via support@casecompass.com
- Provide specific error messages
- Include screenshots if helpful
Last Updated: December 2025