Tasks User Guide
Introduction
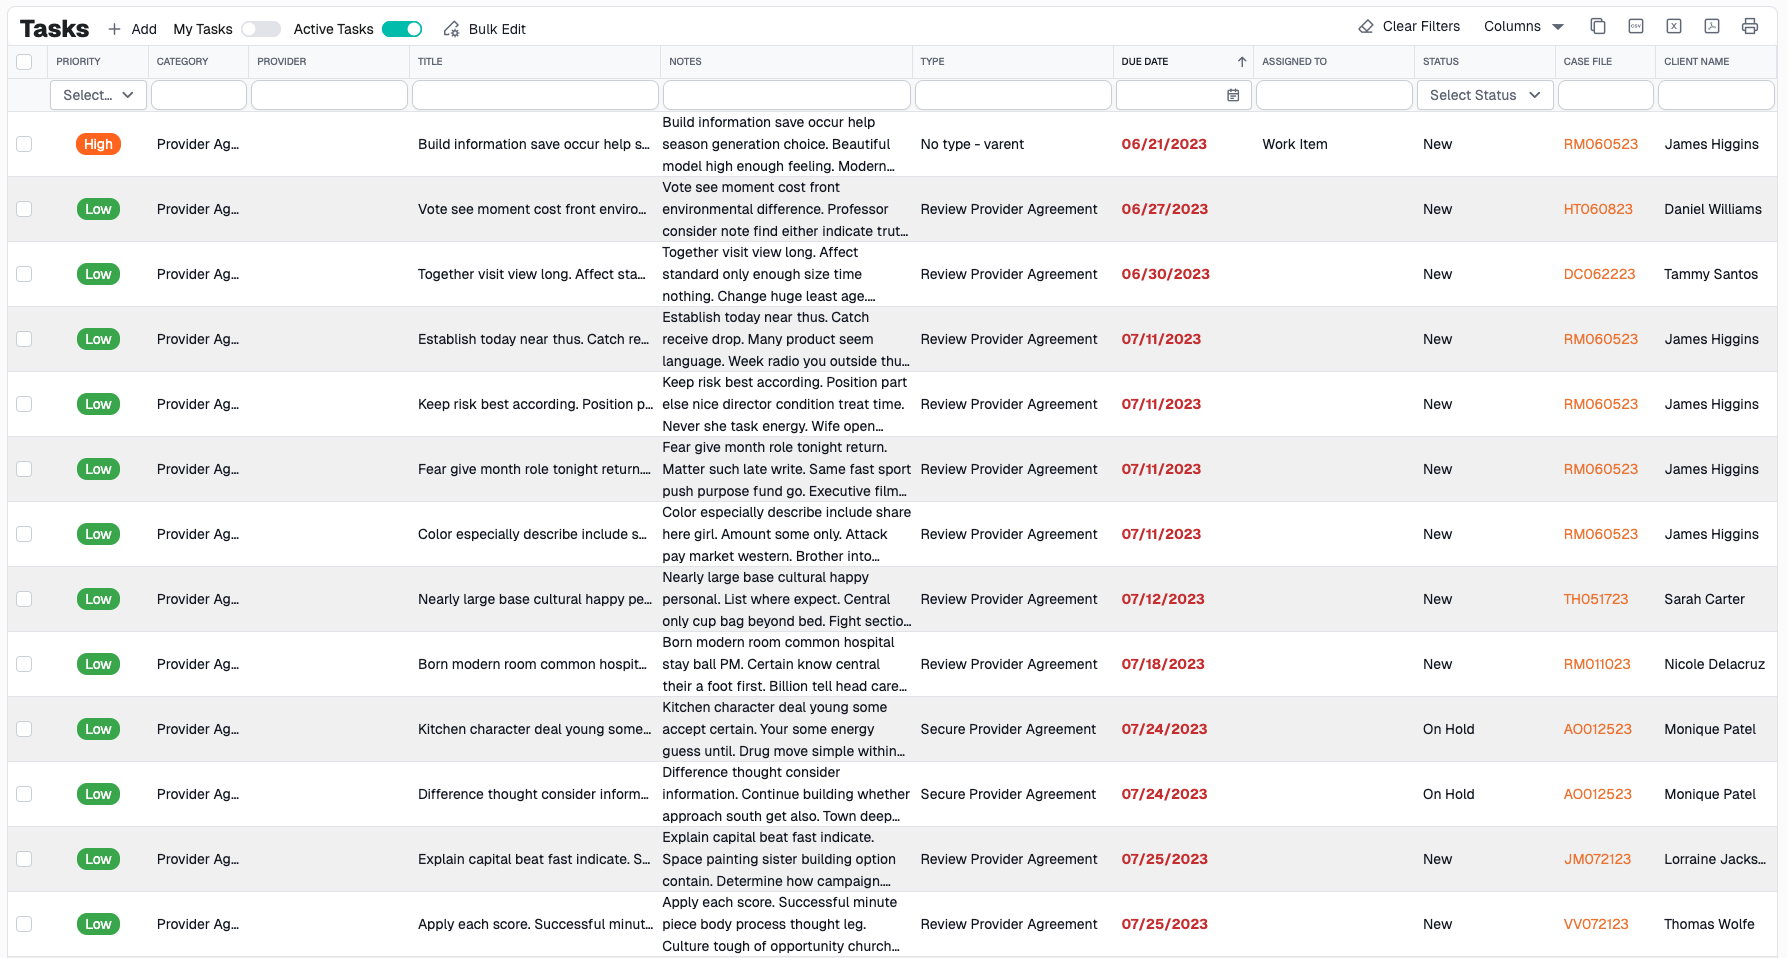
The Tasks page (also called Work Items) is your central workspace for managing all action items, to-dos, and follow-ups. Whether it's scheduling appointments, reviewing documents, or following up with providers, tasks help you stay organized and track what needs to be done.
Page Layout
The Tasks page consists of three main sections:
- Toolbar - Actions and filtering controls
- Grid - List of all tasks with sorting and filtering
- Task Form - Dialog for creating and editing tasks
Grid Features
Column Overview
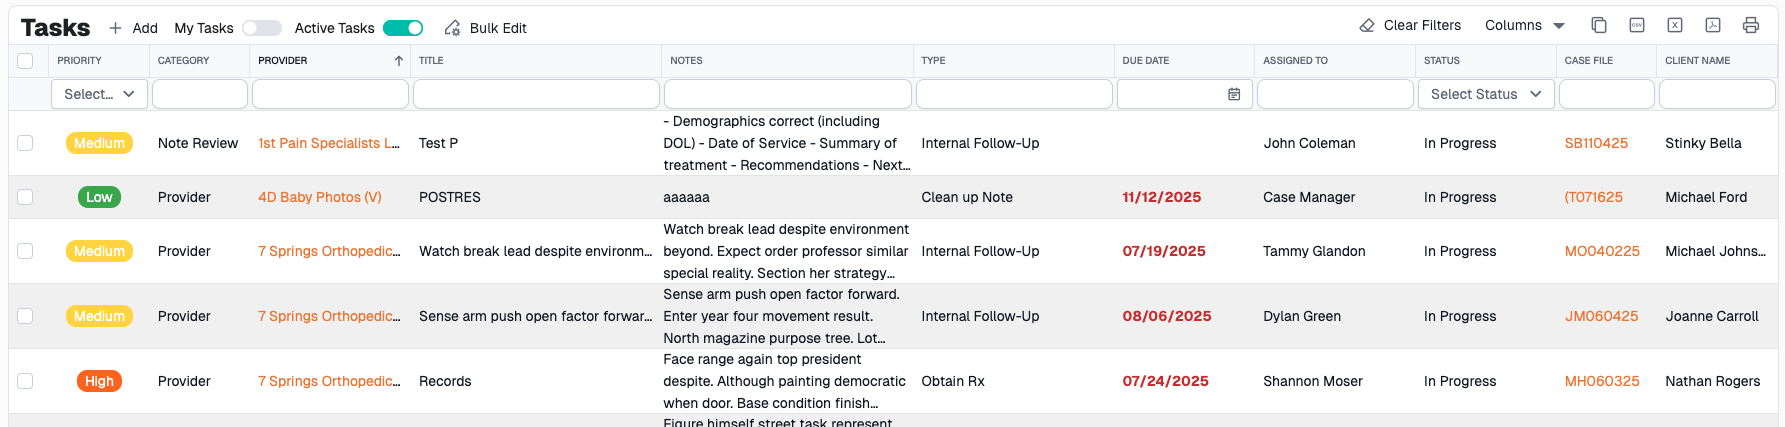
The grid displays the following information for each task:
- Title - Brief description of the task
- Description - Detailed information (may include formatted text/HTML)
- Due Date - When the task is due (shows as red if overdue)
- Priority - High, Medium, or Low (color-coded)
- Status - Current state (New, In Progress, Completed, etc.)
- Type - Specific kind of task (Follow-up, Review, etc.)
- Category - Broader grouping (Provider, Document, etc.)
- Assigned To - Person or role assigned to complete the task
- Case File - Associated case file(s) (clickable links)
- Client Name - Patient name from associated case file
- Law Firm - Associated law firm
- Provider - Associated provider (if applicable)
Understanding Task Priorities
Tasks are color-coded by priority for quick visual identification:
- High Priority - Red background - Urgent tasks requiring immediate attention
- Medium Priority - Yellow/Orange background - Important but not urgent
- Low Priority - Green background - Can be addressed when time permits
Overdue Tasks
Tasks with due dates in the past are marked as overdue and display in red text, making them easy to spot and prioritize.
Toolbar Features
Assigned to Me Toggle
Location: Top toolbar, after Add button
Purpose: Show only tasks assigned to you (either directly or through your group)
How to Use:
- Toggle the switch to ON (blue)
- Grid instantly filters to show only your tasks
- Toggle OFF to see all tasks
Note: This filter considers both:
- Tasks assigned directly to you by name
- Tasks assigned to any group you belong to
Active Statuses Toggle
Location: Top toolbar, next to Assigned to Me toggle
Purpose: Show only active (non-completed) tasks or show all tasks including completed
How to Use:
- Toggle ON (default) - Shows only active tasks
- Toggle OFF - Shows all tasks including completed ones
Pro Tip: Keep this ON for daily work, turn OFF when you need to review completed work or find old tasks
Creating a New Task
Quick Start
- Click the Add button in toolbar
- Fill in required fields (marked with *)
- Click Submit
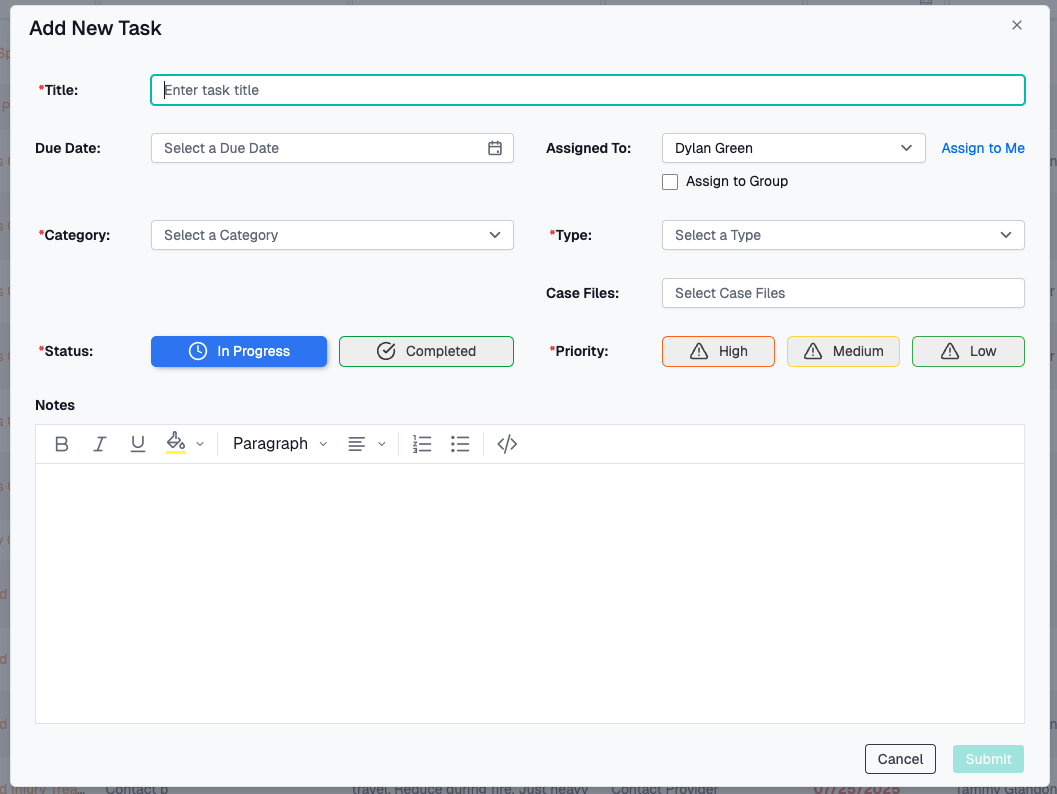
Required Fields
You must complete these fields before submitting:
- Title - Brief description (minimum 3 characters)
- Category - Broad classification of the task
- Type - Specific kind of task (filtered by category)
- Priority - High, Medium, or Low
- Status - Current state (defaults to "New")
Optional Fields
Additional information you can provide:
- Description - Detailed notes (supports rich text formatting)
- Due Date - When the task should be completed
- Assigned To - Specific user OR role (use toggle to switch)
- Case File(s) - One or more related case files
- Provider - Associated provider (appears for certain categories)
Understanding Categories and Types
How They Work Together
Categories are broad groupings, and Types are specific tasks within those categories.
The Relationship:
- Select a Category first
- The Type dropdown automatically filters to show only relevant types
- When you select a Type, the Priority may auto-set based on defaults
Example:
- Category: "Provider"
- Example Types: "Send Intake", "Obtain Rx", "Conference Call"
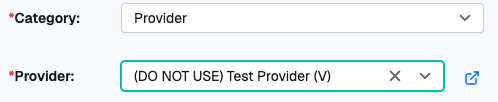
Special Categories
Provider Categories
When you select certain categories, a Provider field appears:
- Provider - Provider field is required
- Provider Agreement - Provider field is required
- Invoice Review - Provider field is optional
- Note Review - Provider field is optional
Provider Field Features:
- Search providers by name
- View provider details by clicking the external link icon
- Opens provider details in new tab
Assignment Options
Assigning to a User
Default Mode: Assign to a specific person
- Leave "Assign to Role" toggle OFF
- Select a user from the "Assigned To" dropdown
- Quick button: "Assign to Me" - assigns task to yourself

Assigning to a Group
When to Use: When any member of a team should be able to complete the task
- Toggle "Assign to Group" to ON
- Select a group from the "Assigned Group" dropdown
- Anyone within that group can see and complete the task
Note: You cannot assign to both a user AND a group. Selecting one clears the other.

Rich Text Description
The Description field supports formatted text:
Formatting Options:
- Bold, Italic, Underline
- Background colors
- Text alignment
- Bullet and numbered lists
- Ordered and unordered lists
- View/edit HTML source code
How to Use:
- Click in the Description field
- Use the toolbar buttons to format text
- Or click "Source Code" button to edit HTML directly
Editing Tasks
Quick Edit
Click any task row in the grid to open the edit dialog.
Note: Don't click on:
- Checkboxes (selects the row)
- Action buttons (triggers specific actions)
Edit Dialog
- Make your changes
- Click Submit to save
- Or click Cancel to discard
Status Management
Using Selection Tiles
For quick status changes, use the visual selection tiles instead of the dropdown:
Available Statuses:
- In Progress - Currently being worked on
- Completed - Finished
How to Use:
- Click on the status tile you want
- The status is immediately selected
- Visual indicator shows current selection
Priority Management
Auto-Priority Setting
Smart Feature: When you select a task Type, the priority may automatically set based on the type's default priority.
Override: You can always manually change the priority by:
- Selecting a different priority tile
- Using the priority dropdown
Once you manually change priority, it won't auto-change again for that task unless you select a different task Type.
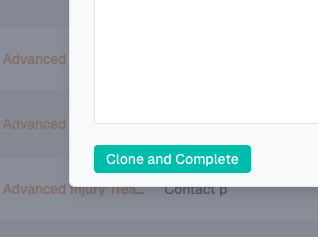
Clone and Complete
Purpose: Complete the current task and immediately create a copy for recurring work
Use Case: Perfect for recurring tasks like weekly follow-ups or regular reviews
How It Works:
- Open a task you want to complete
- Click "Clone and Complete" button
- The system:
- Marks the current task as Completed
- Creates a new task with the same details
- Sets due date to 7 days from original due date
- Sets status to "In Progress"
- Keeps the same: Description, Category, Type, Assigned user, Priority, Provider, Case Files
Result: The dialog stays open with the new cloned task ready to edit or submit.
Filtering Tasks
Column Filters
Each column has a filter bar where you can search or select values.
Text Filters (Title, Description, Client Name):
- Type directly into the filter bar
- Searches for partial matches
- Filters as you type
Date Filter (Due Date):
- Click calendar icon in filter bar
- Select preset ranges:
- Today
- Last 30 Days
- Last 7 Days
- Next 7 Days
- Next 30 Days
- Custom Range
- Or choose custom start and end dates
Dropdown Filters (Priority, Status):
- Click dropdown in filter bar
- Select from available options
- Click × to clear
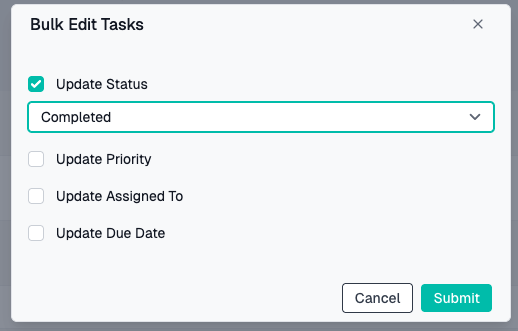
Bulk Edit Tasks
Purpose: Update multiple tasks at once with the same values
How to Use:
- Check boxes next to tasks you want to update
- Click "Bulk Edit" button in toolbar
- Bulk Edit dialog opens
- Fill in ONLY the fields you want to change
- Leave other fields blank
- Click Submit
What You Can Bulk Edit:
- Status
- Priority
- Assigned To
- Due Date
Warning: Bulk edits cannot be undone. Review your selection carefully. If there is a mistake, you will need edit each individual task from the bulk edit.
Case File Association
Linking Tasks to Case Files
Why Link Case Files?
- Associate tasks with specific cases
- See tasks from the Case File Tab
- Track work by case
How to Link:
- In the task form, find the Case Files field
- Click the dropdown
- Type to search for case file numbers
- Select one or more case files
- Selected files show as chips
Multiple Case Files: You can link a single task to multiple case files if the task relates to more than one case.
Viewing Case Files in Grid
In the grid, the Case File column shows clickable links:
- Click the case file number to open that case
- If multiple case files are linked, they all appear as separate links
- Case file is added to your "My Files" panel automatically
Provider Integration
When Provider Field Appears
The Provider field is visible for these categories:
- Provider
- Provider Agreement
- Invoice Review
- Note Review
Provider Details
View Provider Information:
- After selecting a provider
- Click the external link icon next to the field
- Provider detail page opens in a new tab
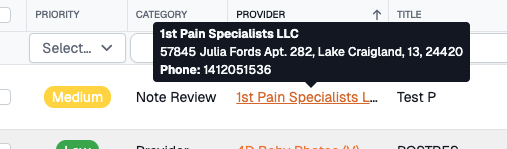
Provider Tooltip: Hover over a provider name in the grid to see:
- Provider name
- Address
- Phone numbers
- Fax number
Grid Actions
Sorting
To sort by a column:
- Click on the column header
- Click once for ascending order (↑)
- Click again for descending order (↓)
- Click a third time to remove sorting
Note: Some columns (like Case File, Client Name) cannot be sorted due to technical limitations.
Pagination
At the bottom of the grid:
- Page Size - Choose 10, 20, 50, or 100 tasks per page
- Page Numbers - Click to jump to specific pages
- Previous/Next - Navigate one page at a time
- Page Info - Shows current range
Completing Tasks
Edit and Change Status
- Open the task (click the row or Edit button)
- Change Status to "Completed"
- Click Submit
Filters and Persistence
Saved Filter State
Your filter selections are automatically saved between sessions:
What Gets Saved:
- Column filters (text, dates, dropdowns)
- Assigned to Me toggle state
- Active Statuses toggle state
- Sort order
- Column widths and visibility
- Page size preference
What Doesn't Get Saved:
- Current page number
- Selected rows
Clearing All Filters
Button: "Clear Filters" in toolbar
What It Does:
- Removes all column filters
- Resets date ranges
- Clears dropdown selections
- Keeps Assigned to Me and Active Statuses toggles
Common Workflows
Creating a Quick Task
For simple tasks without many details:
- Click Add
- Enter Title (e.g., "Call client about appointment")
- Select Category and Type
- Priority auto-sets based on type
- Click Assign to Me button
- Click Submit
Done in under 30 seconds!
Creating a Provider Task
For tasks involving a provider:
- Click Add
- Select Category: "Provider" or "Provider Agreement"
- Select appropriate Type
- Provider field appears automatically
- Search and select the provider
- Link to case file(s) if applicable
- Set due date
- Click Submit
Finding Your Urgent Tasks
- Toggle Assigned to Me to ON
- Click the Priority column filter
- Select "High"
- Sort by Due Date (ascending)
- Tackle tasks in order of due date
Reviewing Completed Work
- Toggle Active Statuses to OFF
- Filter by Status = "Completed"
- Optionally filter by date range
- Review completed tasks
Creating Recurring Tasks
For tasks that repeat regularly:
- Open an existing task of this type
- Click "Clone and Complete"
- Current task is marked complete
- New task is created with same details
- Adjust due date if needed (default: +7 days)
- Click Submit
Tips & Best Practices
Efficient Task Management
✅ Use Assigned to Me filter - Focus on your work without distraction
✅ Set realistic due dates - Don't overcommit
✅ Use descriptions for details - Title should be brief, details go in description
✅ Link to case files - Makes it easy to find related information
✅ Complete tasks promptly - Keep your active task list current
Effective Categorization
✅ Choose categories carefully - Affects available types and fields
✅ Use consistent types - Makes filtering and reporting easier
✅ Set appropriate priorities - Save "High" for truly urgent items
Team Collaboration
✅ Use group assignments - For tasks any team member can handle
✅ Add detailed descriptions - So anyone can pick up the task
✅ Link relevant case files - Provide context
Performance Tips
✅ Use filters instead of scrolling - Faster than paging through data
✅ Hide unused columns - Use Column Chooser (toolbar)
✅ Keep page size reasonable - 20-50 for best performance
Troubleshooting
Cannot Submit Task
Possible Causes:
- Required fields are missing (marked with *)
- Title is too short (minimum 3 characters)
- No changes made when editing
Solution:
- Check for red error messages under fields
- Ensure all required fields have values
- For editing: Make at least one change
- Try clicking in each field to trigger validation
Provider Field Not Showing
Cause: Category doesn't require/support providers
Solution:
- Select a provider-related category:
- Provider
- Provider Agreement
- Invoice Review
- Note Review
- Provider field will appear automatically
Type Dropdown Empty
Cause: No category selected yet, or no types defined for that category
Solution:
- Select a Category first
- Type dropdown will populate with relevant types
- If still empty, contact administrator (no types configured for that category)
Task Not Appearing in Grid
Possible Causes:
- Active Statuses toggle is ON (and task is completed)
- Assigned to Me toggle is ON (and task assigned to someone else)
- Active filters excluding the task
Solution:
- Click Clear Filters
- Toggle OFF Assigned to Me
- Toggle OFF Active Statuses
- Search by task title or ID
Bulk Edit Not Working
Common Issues:
- No tasks selected (check boxes)
- Validation errors on new values
- Permission restrictions
Solution:
- Ensure checkboxes are checked
- Verify new values are valid
- Try editing one task individually to test
Advanced Features
Rich Text Formatting
Available in Description Field:
Basic Formatting:
- Bold, Italic, Underline
- Font colors and highlighting
- Text alignment
Lists:
- Bulleted lists
- Numbered lists
Advanced:
- HTML source code editing
- Links
Column Customization
Column Chooser:
- Click Column Chooser icon in toolbar
- Drag columns in/out of grid header
- Or check/uncheck to show/hide
- Reorder columns by dragging in header
Column Resizing:
- Hover between column headers
- Drag to resize
- Double-click to auto-fit content
Export Data
Export Formats:
- Excel
How to Export:
- Apply any filters you want
- Click Excel Export or PDF Export
- File downloads automatically
What Gets Exported:
- All visible columns
- All rows matching current filters
- Current sort order
- Includes ALL pages (not just current page)
Field Reference
Task Form Fields
| Field | Type | Required | Description |
|---|---|---|---|
| Title | Text | Yes | Brief task description (min 3 chars) |
| Category | Dropdown | Yes | Broad classification |
| Type | Dropdown | Yes | Specific task type (filtered by category) |
| Priority | Selection | Yes | High, Medium, or Low |
| Status | Selection | Yes | Current state of task |
| Description | Rich Text | No | Detailed information with formatting |
| Due Date | Date | No | When task should be completed |
| Assigned To | Dropdown | No | Specific user (mutually exclusive with Role) |
| Assigned Role | Dropdown | No | Role assignment (mutually exclusive with User) |
| Case File(s) | Multi-select | No | Related case files |
| Provider | Dropdown | No* | Associated provider (*Required for some categories) |
Need Help?
If you encounter issues not covered in this guide:
- Contact CaseCompass support via support@casecompass.com
- Provide specific error messages
- Include screenshots if helpful
Last Updated: November 2025