Providers User Guide
Overview
The Providers page is your comprehensive hub for managing healthcare provider information, contacts, and billing relationships. Track provider details, maintain contact information, monitor billing status, and manage provider networks effectively.
Purpose:
- Maintain a complete directory of healthcare providers
- Store contact information and addresses
- Track provider types and specialties
- Monitor billing and fee schedules
- Manage provider relationships
- Access detailed provider history
Accessing Providers
- Click Providers in the main navigation menu
- The providers grid displays with all active providers by default
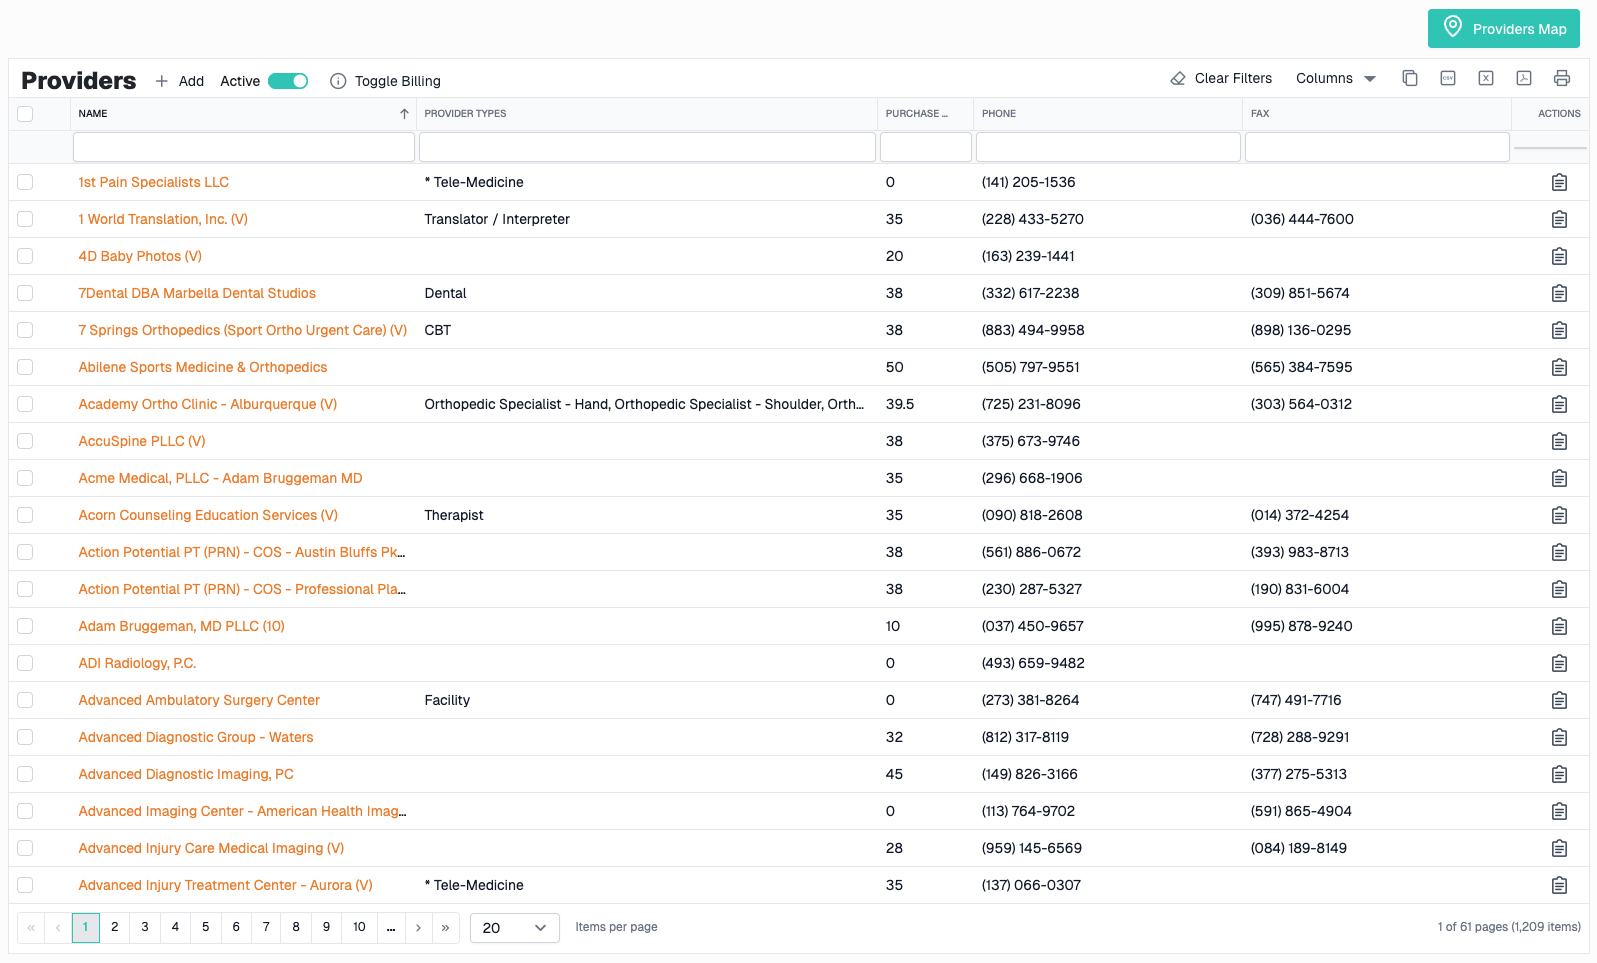
Providers Grid
Grid Columns
| Column | Description |
|---|---|
| Name | Provider name (clickable to view details) |
| Provider Type(s) | Types of services offered (e.g., MRI, Physical Therapy, Billing) |
| Address | Primary business address |
| City | City location |
| State | State location |
| Zip Code | ZIP/Postal code |
| Phone | Primary phone number |
| Fax | Fax number (if available) |
| Fee Schedule | Assigned fee schedule |
| Spanish Speaking | Spanish language services available |
| Reimbursement Rate | Provider's reimbursement percentage |
| Referring Provider | Whether provider can make referrals |
| Tax ID | Provider's Tax ID/EIN |
| Created At | Date provider was added to system |
| Is Active | Active/Inactive status indicator |
| Actions | Edit and view audit logs |
Sorting
Click any column header to sort:
- First click - Sort ascending
- Second click - Sort descending
- Third click - Remove sort
Default Sort: Name (A-Z)
Note: Some relationship columns (address, phone, provider types) cannot be sorted from the backend
Filtering
Text Filters
Type in the filter bar below any column to search:
- Name - Search by provider name
- Provider Type(s) - Search by service type
- Address - Search by street address
- City - Search by city name
- Zip - Search by ZIP code
- Phone - Search by phone number
- Fax - Search by fax number
- Tax ID - Search by Tax ID
Tip: Filters use "contains" matching, so partial searches work
Dropdown Filters
State Filter:
- Click filter bar under State column
- Select from dropdown list of all states
- Shows providers in selected state only
Fee Schedule Filter:
- Click filter bar under Fee Schedule column
- Select from dropdown list of fee schedules
- Shows providers with selected fee schedule
Is Active Filter:
- Click filter bar under Is Active column
- Select "Active", "Inactive", or "All"
- Filters grid to show selected status
Spanish Speaking Filter:
- Click filter bar under Spanish Speaking column
- Select "Yes", "No", or "All"
- Shows providers with selected language capability
Referring Provider Filter:
- Click filter bar under Referring Provider column
- Select "Yes", "No", or "All"
- Shows providers with selected referral status
Active/Inactive Toggle
Toggle Button: Located in the toolbar (switch icon)
- ON (default) - Shows only active providers
- OFF - Shows all providers (active and inactive)
Usage:
- Click the toggle switch in the toolbar
- Grid refreshes automatically
- Toggle state is saved for next visit

Toggle Billing Filter
Toggle Billing Button: Located in the toolbar
Purpose: Quickly filter to show only billing providers
Usage:
- Click Toggle Billing button in toolbar
- Grid filters to show only providers with "Billing" in their provider types
- Click again to remove filter
- Filter state is saved for next visit
Use this when you need to quickly find billing companies
Pagination
Controls:
- First/Previous/Next/Last page buttons
- Page number display
- Items per page dropdown
Page Size Options:
- 10 items per page
- 20 items per page (default)
- 50 items per page
- 100 items per page
Grid Persistence
What Gets Saved:
- Column widths
- Column order
- Column visibility
- Filter values
- Active toggle state
- Billing toggle state
- Sort order
How It Works:
- Saved automatically to browser local storage
- Persists between sessions
- Specific to your user account
To Reset: Click the Reset button in toolbar to restore defaults
Creating a Provider
Opening the Form
- Click Add button in the toolbar
- "Add Provider" dialog opens
Required Fields
⚠️ Must complete before saving:
- Name - Full provider name or practice name
- Provider Type(s) - Select one or more provider types (multi-select)
- Priority Status - Select priority/network status
- Referring Provider - Select Yes or No
- Address Information (for new providers)
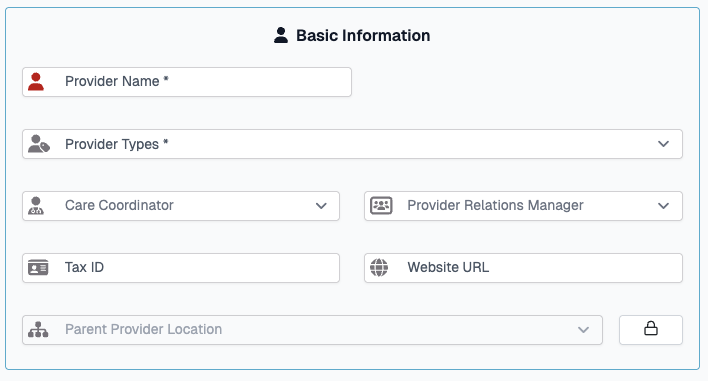
Provider Information Fields
Basic Information:
| Field | Description |
|---|---|
| Name | Full provider or practice name (required) |
| Provider Type(s) | Service types offered - multi-select (required) |
| Tax ID | Provider's EIN/Tax ID in XX-XXXXXXX format |
| Master Provider | Link to parent provider (for sub-locations) |
Network & Priority:
| Field | Description |
|---|---|
| Priority Status | Network tier (Preferred 10, Preferred, Secondary, Virtual, Not in Network) |
| Referring Provider | Can this provider make referrals? (Yes/No) |
| Fee Schedule | Assigned fee schedule for billing |
| Reimbursement Rate | Reimbursement percentage (e.g., 75 for 75%) |
| Reimbursement Rate Effective Date | Date rate became effective |
Coordinators & Managers:
| Field | Description |
|---|---|
| Care Coordinator | Assigned care coordinator |
| Provider Relations Manager | Assigned provider relations manager |
Documentation & Compliance:
| Field | Description |
|---|---|
| Signed Purchase Agreement | Yes / No / SCA Only |
| Signed HIPAA | Yes (1) / No (0) |
| Signed HIPAA Date | Date HIPAA was signed |
| Signed W9 | Yes (1) / No (0) |
| Signed W9 Date | Date W9 was signed |
| W9 Name | Legal name on W9 (if different from provider name) |
Provider Characteristics:
| Field | Description |
|---|---|
| Spanish Speaking | Offers Spanish language services (checkbox) |
| Checkpoint Eligible | Eligible for checkpoint program (checkbox) |
| Virtual Provider | Provides virtual/telehealth services (checkbox) |
| Holds Own AR | Provider manages their own accounts receivable (checkbox) |
| Website URL | Provider's website |
Notes:
| Field | Description |
|---|---|
| Notes | Rich text notes about the provider |
Status:
| Field | Description |
|---|---|
| Is Active | Active/Inactive status (checkbox, defaults to Active) |
Master Provider
Purpose: Link sub-locations or satellite offices to a main provider
How It Works:
- The Master Provider field is locked by default (🔒 icon)
- Click the lock icon to unlock and enable the dropdown
- Select a parent provider from the dropdown
- Only standalone master providers or master providers with existing locations will appear in the list
- Current provider is excluded from the list
Use Cases:
- Chain practices with multiple locations
- Satellite offices under main provider
- Franchise operations

Address Information
Adding Primary Address:
- Scroll to Address section
- Fill in address fields:
- Address 1 - Street address (required)
- Address 2 - Suite, unit, etc. (optional)
- City - City name (required)
- State - Select from dropdown (required)
- ZIP Code - 5 or 9-digit ZIP (required)
- County - County name (optional)
Geocoding: When you save the address, the system automatically:
- Geocodes the address using Google Maps
- Stores latitude and longitude
- Enables the provider to appear on the Provider Map
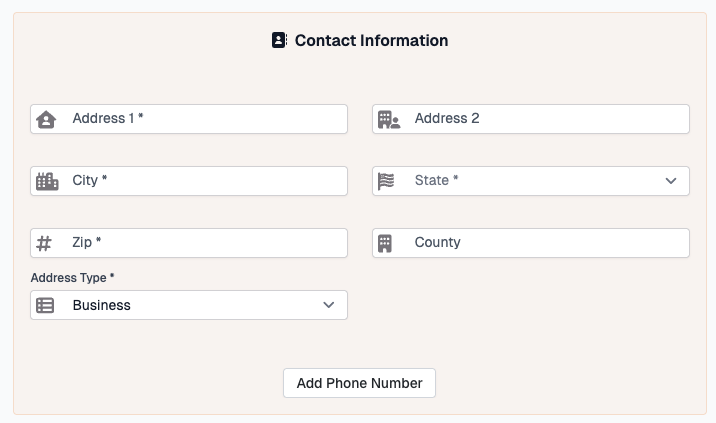
Phone Numbers
Adding Phone Number:
- Scroll to Phone Numbers section
- Initial phone form displays
- Fill in phone details:
- Phone Number - 10-digit number (required)
- Extension - Phone extension (optional)
- Phone Type - Business, Fax, Mobile, etc.
Adding Additional Phones:
- Click + (Plus) button
- New phone form appears
- Fill in details
- Repeat for multiple phone numbers
Removing Phone Number:
- Click - (Minus) button next to phone form
- Phone form removed immediately
- If existing phone, it's marked for deletion on save
Tip: Add both main phone and fax number for complete contact info
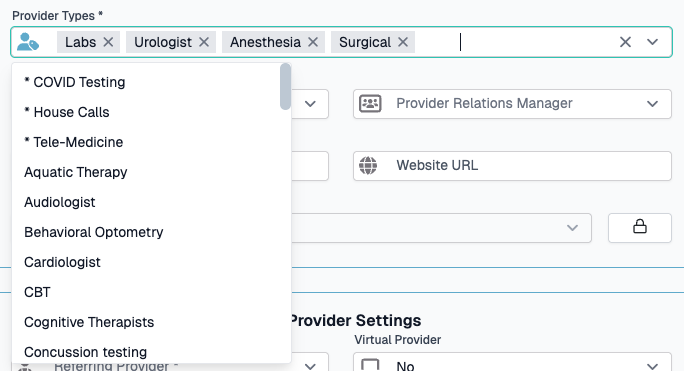
Provider Types (Multi-Select)
Selecting Provider Types:
The Provider Types field is a multi-select dropdown that allows you to assign multiple service types to a provider.
Common Provider Types:
- MRI
- Physical Therapy
- Chiropractic
- Orthopedic Surgery
- Pain Management
- Billing
- Diagnostic Imaging
- And many more...
How to Select:
- Click the Provider Type(s) field
- Dropdown opens with all available types
- Check/select multiple types as needed
- Types display as tags in the field
- Click X on a tag to remove it
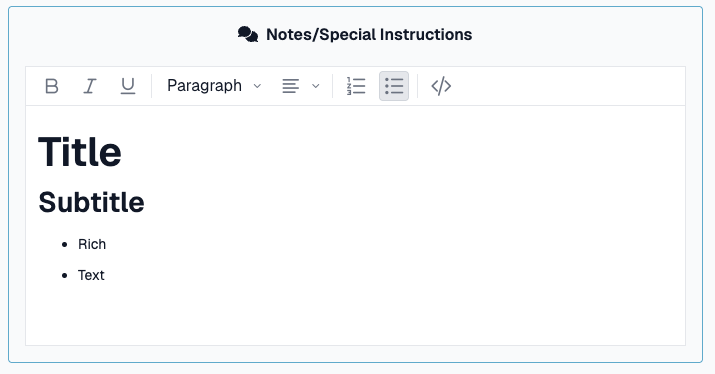
Rich Text Notes
Using the Notes Editor:
The Notes field includes rich text formatting:
Toolbar Options:
- Bold, Italic, Underline
- Formats - Headings, paragraphs
- Alignments - Left, center, right
- Lists - Ordered and unordered
- Source Code - Edit raw HTML
Best Practices:
- Use headings for organization
- Use lists for multiple items
- Keep formatting simple
- Use Important Notes checkbox for critical information
Submitting the Form
- Review all entered information
- Click Submit button at bottom
- Form validates all required fields
- Progress messages show:
- "Saving provider information..."
- "Saving phone information..."
- "Saving address information..."
- "Adding provider types..."
- "Linking phones..."
- "Linking address..."
- Address is geocoded automatically
- Success message displays
- Dialog closes
- Grid refreshes with new provider
Validation Errors:
If required fields are missing:
- Fields highlight in red
- Error messages display
- Form remains open
- Scroll to errors and correct
Canceling
To cancel without saving: 1. Click Cancel button 2. Or click X in dialog corner 3. Form closes without saving 4. Any entered data is lost
Editing a Provider
Opening for Edit
Method 1: Click Name
- Click the provider name in the grid
- Redirects to Provider Details page (full view)
Method 2: Actions Column
- Click Edit icon in Actions column
- Edit dialog opens
Making Changes
Edit Form Behavior:
- Form pre-fills with existing data
- All fields are editable
- Address and phone numbers display
- Only changed fields are saved (for PATCH operations)
Provider Type Changes:
When editing provider types:
- Form compares new selections to original
- Adds new type associations
- Removes deselected type associations
- Updates XrefProviderProviderTypes junction table
Phone Number Changes:
- Edit Existing - Modify phone form and it saves
- Add New - Click + and fill in new phone
- Remove - Click - to mark for deletion
Address Changes:
- Modify any address field to save changes
- Address will be re-geocoded if location changes
- Latitude/Longitude updated automatically
Master Provider Lock
For Existing Providers:
The Master Provider field is locked by default to prevent accidental changes.
To Change Master Provider:
- Click the 🔒 Lock icon to unlock
- Icon changes to 🔓 Unlocked
- Dropdown becomes enabled
- Select new master provider
- Save form
Restrictions:
- Cannot change if provider has child providers
- Cannot select self as master provider
- Can only select standalone master providers
Deactivating a Provider
Instead of deleting, mark as inactive:
- Open provider for editing
- Scroll to Is Active checkbox
- Uncheck Is Active
- Submit form
- Provider hidden from default view (unless Active toggle is OFF)
Why Deactivate Instead of Delete:
- Preserves case file associations
- Maintains appointment history
- Can be reactivated if needed
- Audit trail remains intact
Grid Actions
Toolbar Actions
Add Button
- Opens form to create new provider
Excel Export
- Exports current grid view to Excel file
- Includes visible columns only
- Respects active filters
- Opens in Excel or downloads
Column Chooser
- Show/hide grid columns
- Click and select columns
- Changes saved automatically
Reset Button
- Clears all filters
- Resets column order and widths
- Resets to default page size
- Reloads grid data
Toggle Billing
- Filters to show only billing providers
- Click again to remove filter
- Helpful for finding billing companies quickly
Row Actions
Name Click
- Click provider name to navigate to Provider Details page
- Full provider information and related data
- Appointments, invoices, case files, etc.
Logs (History Icon)
- Opens audit log dialog
- Shows complete change history
- Displays who made changes and when
Audit Logs
Viewing Change History
To view audit logs:
- Click Logs icon in Actions column
- Audit Logs dialog opens
- View complete change history
Information Displayed:
| Column | Description |
|---|---|
| Field Changed | Which field was modified |
| Old Value | Previous value |
| New Value | Updated value |
| Changed By | User who made the change |
| Changed On | Date and time of change |
| Action Type | Created, Updated, or Deleted |
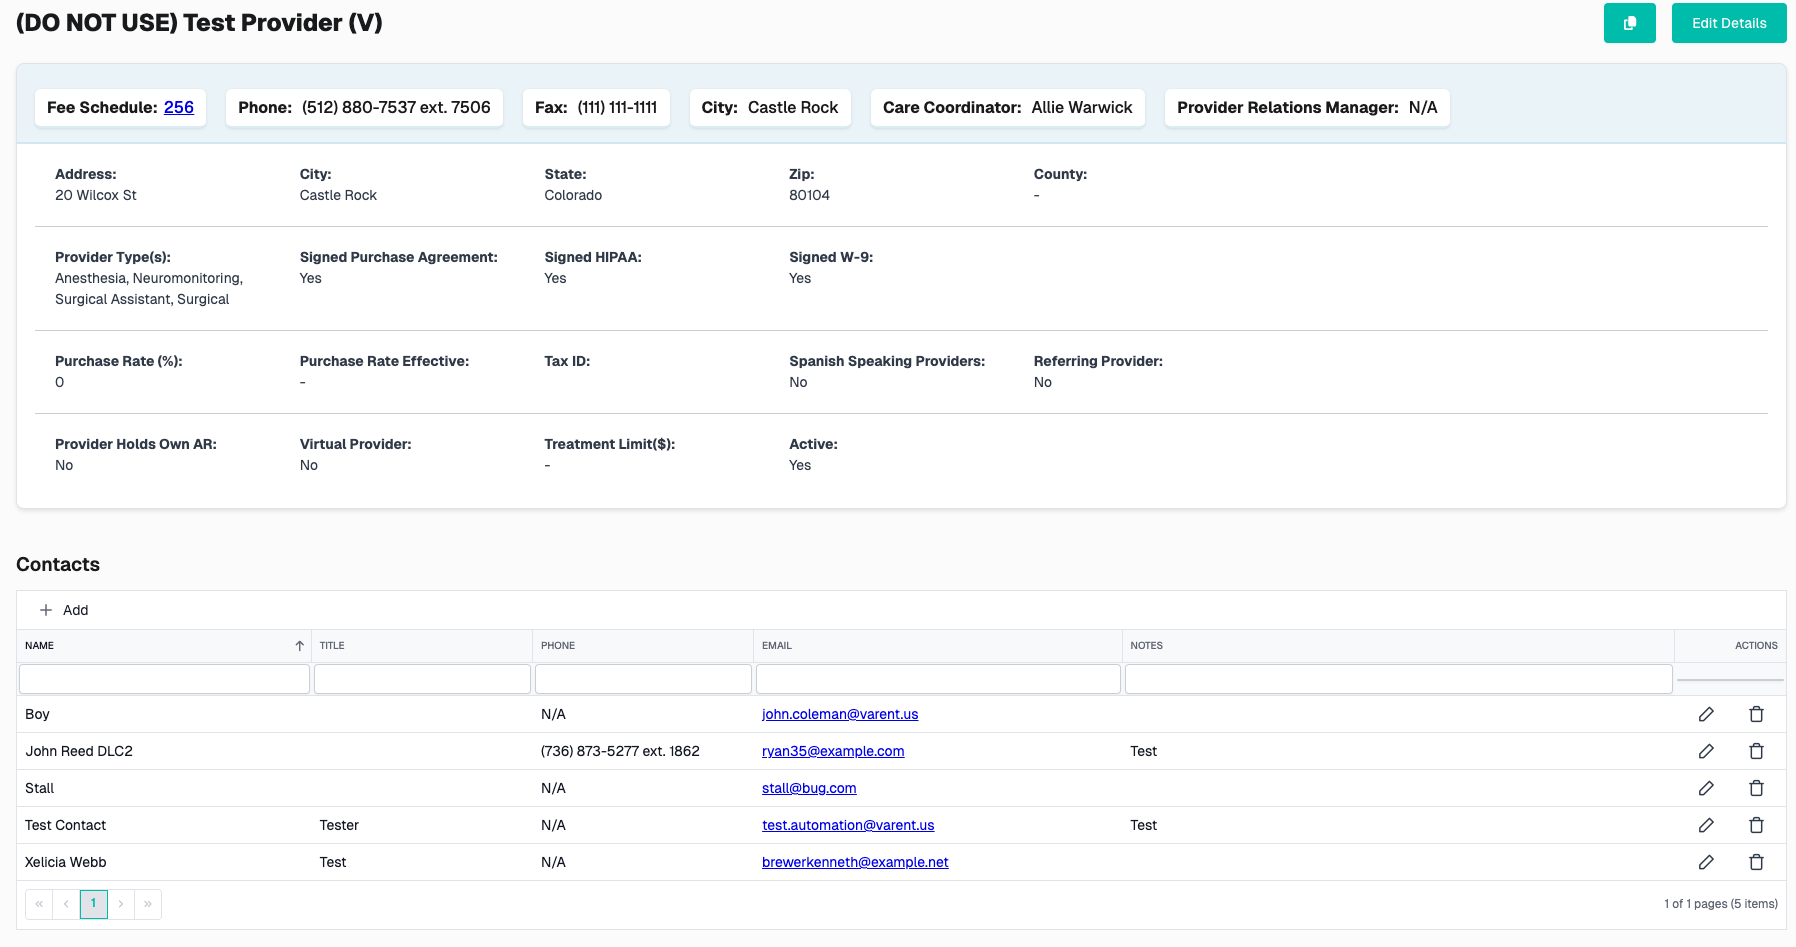
Provider Details Page
Accessing Provider Details
From Grid:
- Click provider name in grid
- Navigates to full provider details page
What You'll Find:
- Complete provider information
- Contacts
- Provider locations (if master provider)
Common Workflows
Adding a New Provider
- Click Add button
- Enter required fields:
- Name
- Provider Type(s)
- Priority Status
- Referring Provider (Yes/No)
- Add address information (required for new providers)
- Add at least one phone number
- Add fax number (if available)
- Assign fee schedule and reimbursement rate
- Select care coordinator and provider relations manager
- Enter compliance information (agreements, W9, HIPAA)
- Add any additional provider characteristics
- Enter notes about the provider
- Ensure Is Active is checked
- Submit form
- Confirm in grid
Updating Provider Information
- Find provider in grid (use filters if needed)
- Click Edit icon
- Update relevant fields:
- Provider types
- Fee schedule
- Reimbursement rate
- Contact information
- Compliance documents
- Update phone numbers if needed
- Update address if changed
- Submit form
- Verify changes in grid
Creating Sub-Locations
To link a satellite office to a main provider:
- First, ensure main provider exists
- Click Add to create new provider
- Enter new provider information
- Scroll to Master Provider field
- Click 🔒 Lock icon to unlock
- Select parent provider from dropdown
- Complete rest of form
- Submit
- Sub-location is now linked to master provider
Finding Billing Providers
Quick Method:
- Click Toggle Billing button in toolbar
- Grid filters to show only billing providers
- Review billing provider list
Filter Method:
- Use Provider Type(s) filter
- Type "Billing"
- Grid filters to matching providers
Finding Providers by Location
- Use State dropdown filter
- Select desired state
- Optionally add City text filter
- Review providers in location
Finding Inactive Providers
- Toggle Active switch to OFF
- Use Is Active filter → Select "Inactive"
- Review inactive providers
- Reactivate if needed by editing and checking Is Active
Tips & Best Practices
Data Entry
✅ Select all applicable provider types - Providers often offer multiple services
✅ Keep compliance docs updated - Track W9, HIPAA, and purchase agreements
✅ Use priority status - Helps with provider selection and scheduling
✅ Include all contact methods - Phone, fax, and website
✅ Set reimbursement rates - Important for financial tracking
✅ Use master provider - Organize multi-location practices
✅ Mark inactive, don't delete - Preserves appointment and case history
Organization
✅ Regular reviews - Check inactive providers quarterly
✅ Update managers - Keep coordinator and relations manager assignments current
✅ Verify addresses - Confirm accuracy for geocoding and maps
✅ Standardize naming - Use consistent formats for provider names
✅ Monitor fee schedules - Ensure providers have correct billing rates
Grid Management
✅ Save common views - Use column chooser for custom views
✅ Use Toggle Billing - Quick access to billing providers
✅ Combine filters - Use multiple filters for precise results
✅ Export for reporting - Use Excel export for analysis
✅ Check audit logs - Review changes when data seems incorrect
Troubleshooting
Provider Not Showing in Grid
Possible Causes:
- Provider is inactive and Active toggle is ON
- Active filters excluding the provider
- Billing toggle is ON (hides non-billing providers)
- Not yet created or was deleted
Solution:
- Turn Active toggle OFF to see all providers
- Click Reset to clear all filters
- Turn off Toggle Billing if it's active
- Check Is Active filter dropdown
Cannot Edit Provider
Possible Causes:
- Insufficient permissions
- Provider is locked/archived
- Form validation errors
Solution:
- Check your user permissions
- Contact CaseCompass support via support@casecompass.com
- Review form for validation errors
Master Provider Field Disabled
Possible Causes:
- Field is locked (by design)
- Provider has child providers (cannot change)
Solution:
- Click the 🔒 Lock icon to unlock
- If provider has children, cannot change master provider
Provider Types Not Saving
Possible Causes:
- No provider types selected
- Selection was cleared accidentally
- Backend error
Solution:
- Ensure at least one provider type is selected
- Check for error messages
- Try again or contact support
Address Not Geocoding
Possible Causes:
- Invalid or incomplete address
- Google Maps API issue
- Address format not recognized
Solution:
- Verify address is complete and correct
- Use standard address format
- Check for typos
- May need to geocode manually later
Phone Numbers Not Saving
Possible Causes:
- Invalid phone number format
- Missing required phone type
- Validation errors
Solution:
- Ensure 10-digit format (no dashes or spaces)
- Select phone type for each number
- Check for error messages in form
Reimbursement Rate Not Displaying
Possible Causes:
- Rate not set for provider
- Percentage entered incorrectly
- Display issue
Solution:
- Enter rate as whole number (e.g., 75 for 75%)
- Ensure value is between 0-100
- Refresh grid
Need Help?
If you encounter issues not covered in this guide:
- Contact CaseCompass support via support@casecompass.com
- Provide specific error messages
- Include screenshots if helpful
Last Updated: November 2025