Case Files User Guide
Introduction
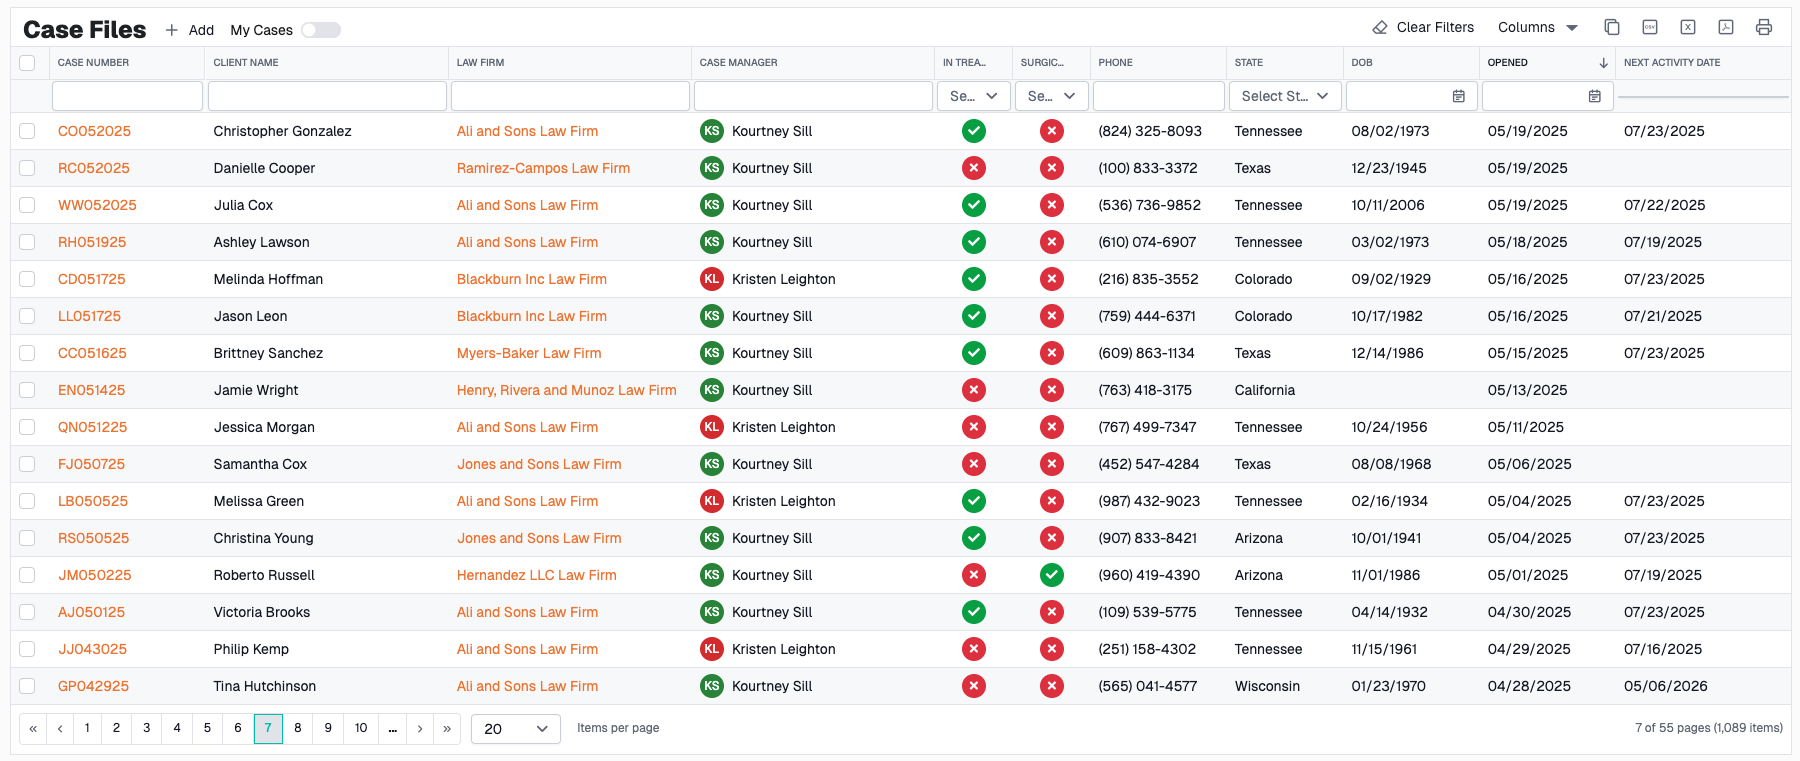
The Case Files page is the central hub for managing all case files in CaseCompass. This page provides a comprehensive grid view of cases with powerful filtering, searching, and editing capabilities. You can create new case files, edit existing ones, and track case information all in one place.
Page Layout
The Case Files page consists of three main sections:
- Toolbar - Actions and controls at the top
- Grid - Tabular display of all case files
- Dialogs - Forms that appear for creating/editing cases
Grid Features
Column Overview
The grid displays the following information for each case file:
- File Number - Unique identifier for the case (clickable to open case hub)
- Patient Name - Full name of the patient
- Law Firm - Associated law firm
- Case Manager - Assigned case manager
- In Treatment - Whether case is currently active
- Surgical - Whether case involves surgery
- File Opened Date - When the case was opened
- Next Activity Date - Earliest upcoming incomplete task due date
- Phone - Patient's primary phone number
- State - Patient's address state
Interacting with the Grid
Sorting
To sort by a column:
- Click on any column header
- Click once for ascending order (↑)
- Click again for descending order (↓)
- Click a third time to remove sorting
Filtering
Each column has a filter bar beneath the header where you can enter search criteria.
Text Filters (File Number, Patient Name):
- Type directly into the filter bar
- Filters automatically as you type
- Searches for partial matches (contains)
Date Range Filters (File Opened, DOB, Next Activity Date):
- Click the calendar icon in the filter bar
- Select a preset range (Today, This Week, This Month, etc.)
- Or select custom start and end dates
- Click "Apply" to filter
Dropdown Filters (State, In Treatment, Surgical):
- Click the dropdown arrow in the filter bar
- Select from available options
- Click "×" to clear the filter
Pagination
At the bottom of the grid:
- Page Size Dropdown - Choose 20, 50, 100, or 500 rows per page
- Page Numbers - Click to jump to specific pages
- Previous/Next Arrows - Navigate one page at a time
- Page Info - Shows current range (e.g., "1-20 of 250")
Toolbar Features
My Cases Toggle
Location: Top of the grid, next to the Add button
Purpose: Filter the grid to show only cases where you are the assigned case manager
How to Use:
- Toggle the switch to ON (blue)
- Grid instantly filters to your cases only
- Toggle OFF to see all cases again
Note: This setting persists—your preference is saved between sessions

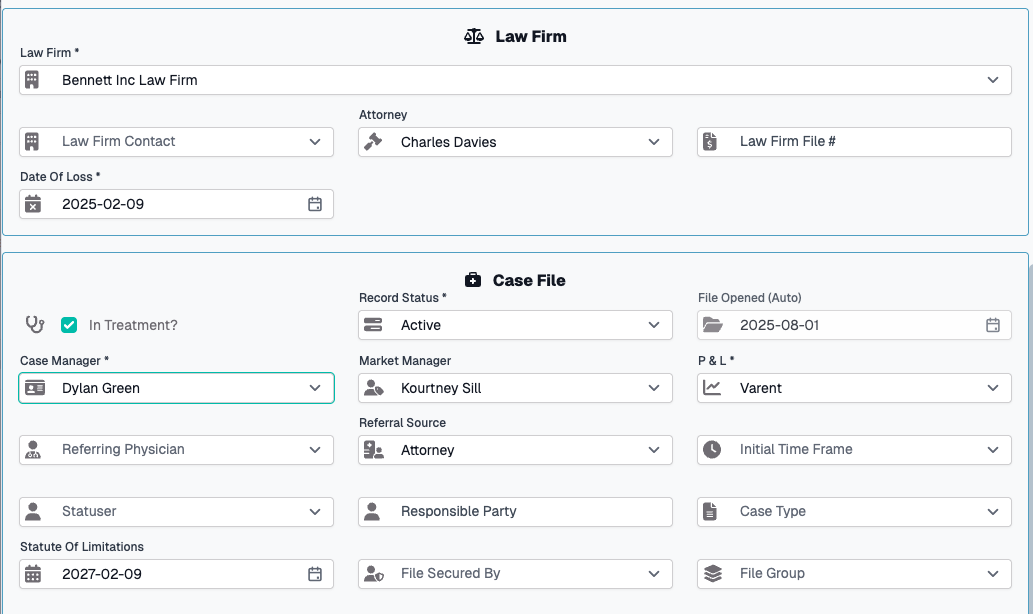
Add New Case File
Button: "Add" in the toolbar
Steps to Create a New Case File:
- Click the Add button in the toolbar
- The "New Case File" dialog opens
- Fill in the required fields (marked with red asterisk *)
- Optionally fill in additional details
- Add patient information
- Click Submit to create the case
- Or click Cancel to discard
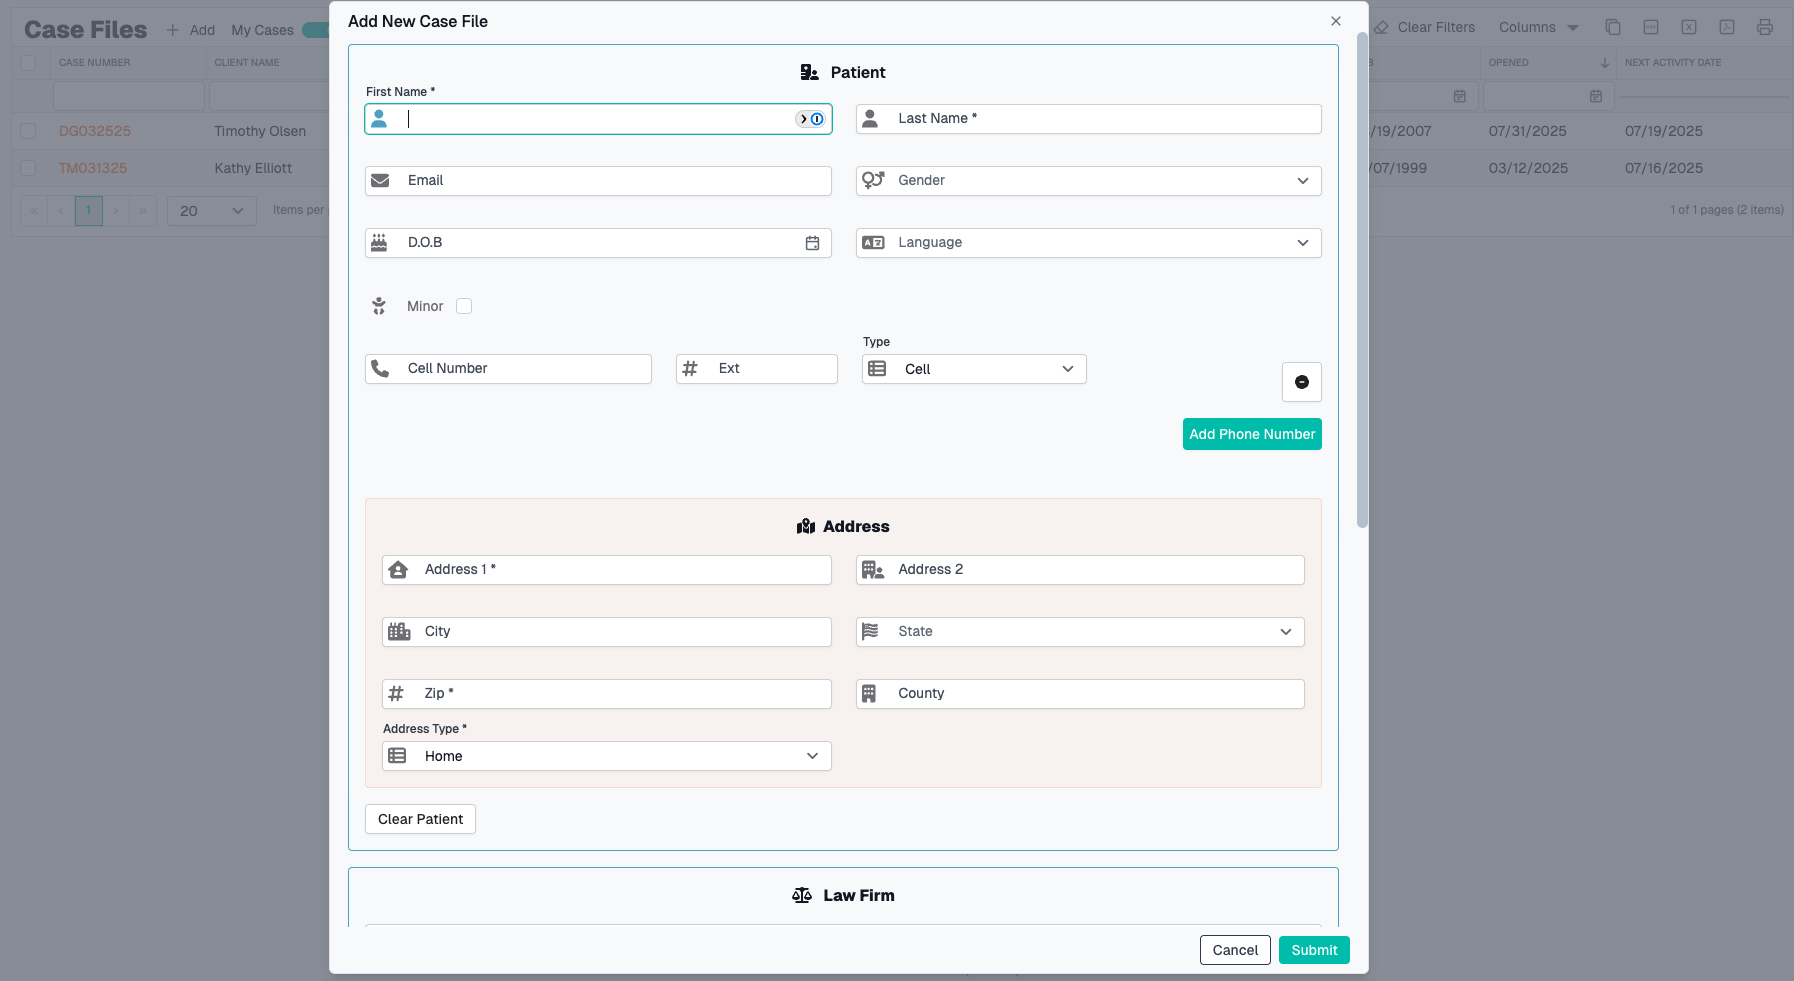
Required Fields
You must complete these fields before submitting:
- File Opened - Date the case file was opened (defaults to today)
- Date of Loss - When the incident occurred
- Law Firm - Select from dropdown
- P&L - Profit & Loss classification
- Case Manager - Person managing this case
- Law Firm Contact - Primary contact at the law firm
- Record Status - Current status of the record

Optional Fields
Additional information you can provide:
- Law Firm File Number - Law firm's internal reference number
- Attorney - Assigned attorney (filtered by selected law firm)
- Case Type - Category of case
- Market Manager - Market management assignment
- Referral Source - How the case was referred
- Referring Physician - Doctor who referred the case
- Responsible Party - Financial responsible party
- Statuser - User responsible for status updates
- Statute of Limitations - Auto-calculated from Date of Loss (2 years after Date of Loss)
- Statusing Group - Group for status tracking
- File Group - Organizational grouping
- File Secured By - Who secured the case
- Initial Time Frame - Expected timeline
- Comments - Free-text notes
- In Treatment - Toggle (defaults to ON)
- Surgical - Toggle if case involves surgery
- Exclude from Balance Due - Toggle for billing purposes
- Companion Cases - Related case files (select multiple)
Patient Information Section
When creating or editing a case file, you must also provide patient information.
Toggle Button: "Show Patient Info" / "Hide Patient Info"
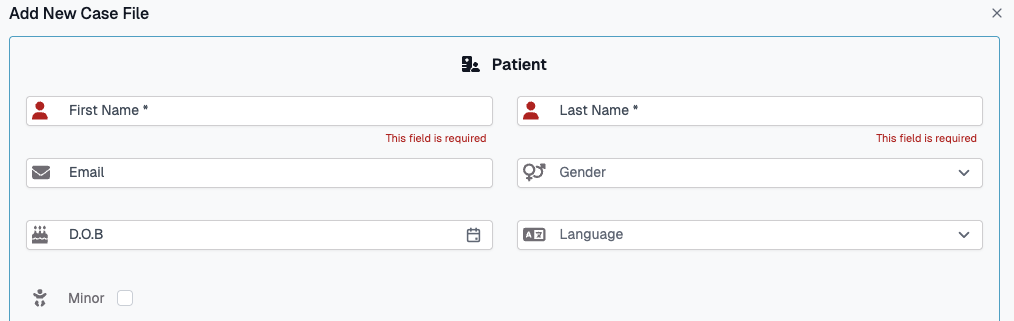
Required Patient Fields:
- First Name
- Last Name
- Date of Birth
- Gender
- Primary Phone Number
- Primary Address
Optional Patient Fields:
- Middle Name
- Language
- Email Address
- Additional Phone Numbers
How to Add Patient Info:
- Click "Show Patient Info" button if not visible
- Fill in required patient fields (marked with *)
- Add phone number(s)
- Add address information
- Add additional phone numbers if needed
- Patient is automatically created when you submit the case file
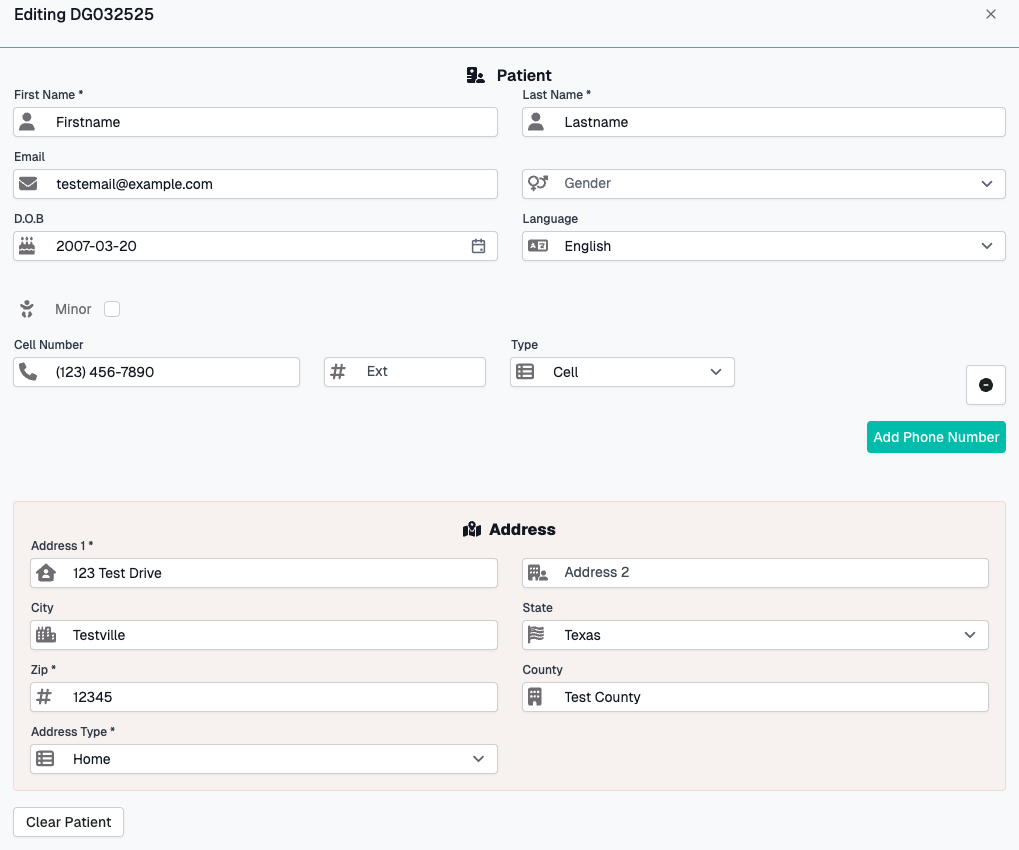
Edit Case File
How to Edit:
- Find the case file in the grid
- Click the Edit icon (pencil) in the Actions column
- The "Edit Case File" dialog opens
- Make your changes
- Click Submit to save
- Or click Cancel to discard changes
What You Can Edit:
- All case file fields
- Patient information (if needed)
- Companion case associations
Note: File Number cannot be changed after creation
Column Chooser
Purpose: Customize which columns are visible in the grid
How to Use:
- Click the Column Chooser icon in the toolbar
- A panel appears showing all available columns
- Drag columns into or out of the grid header
- Or click checkboxes to show/hide columns
- Changes are saved automatically
Pro Tip: Hide columns you don't need to reduce clutter and improve performance!
Column Order
Purpose: Customize the order in which columns are visible in the grid
How to Use:
- Click and hold on any column header you want to move
- Drag the column left or right to your desired position
- A visual indicator shows where the column will be placed
- Release to drop the column in its new position
- Changes are saved automatically
Pro Tip: Arrange your most frequently used columns to one side for easier access
Resize Columns
How to Resize:
- Hover over the line between column headers
- Cursor changes to resize indicator (↔)
- Click and drag to adjust width
- Column width is automatically saved
Auto-Fit:
- Double-click the line between columns
- Column automatically resizes to fit content
Export Data
Button: "Excel Export" or "PDF Export" in the toolbar
How to Export:
- Apply any filters you want (exports respect filters)
- Click Excel Export or PDF Export
- File automatically downloads
- Open in Excel or PDF viewer
What Gets Exported:
- All visible columns
- All rows matching current filters
- Current sort order
Advanced Features
Companion Cases
What Are Companion Cases? Related case files that should be linked together (e.g., multiple injuries from the same incident, family members involved in the same accident).
How to Link Companion Cases:
- When creating or editing a case file
- Scroll to the Companion Cases field
- Click the dropdown
- Type to search for case file numbers
- Select one or more cases to link
- Submit the form
Viewing Companion Cases:
- Companion case links are visible in the case file hub
- All linked cases show the relationship
Automatic Statute of Limitations Calculation
When you enter a Date of Loss, the system automatically calculates the Statute of Limitations based on state-specific rules (typically 2 years from date of loss).
How It Works:
- Enter or select Date of Loss
- Statute of Limitations field auto-populates
- You can manually adjust if needed
Law Firm Dependencies
When you select a Law Firm, several fields automatically update or filter:
Auto-Populated:
- Case Manager - Default from law firm settings
- Market Manager - Default from law firm settings
Filtered:
- Law Firm Contact - Shows only contacts associated with selected firm
- Attorney - Shows only attorneys associated with selected firm
Why This Matters:
Always select the Law Firm first when creating a case to ensure you see the correct contacts and attorneys.
Next Activity Date
The Next Activity Date column shows the earliest due date from all incomplete work items (tasks) associated with the case file.
What It Means:
- Shows the most urgent upcoming task
- Helps you prioritize case work
- Automatically calculated from work items
- Excludes completed tasks
If Blank:
- No upcoming work items scheduled
- All work items are complete
Filters and Persistence
Saved Filter State
Your filter selections are automatically saved and will be restored when you return to the Case Files page:
What Gets Saved:
- Column filters (text, date ranges, dropdowns)
- Sort order
- Column widths and visibility
- Page size preference
What Doesn't Get Saved:
- Current page number (always returns to page 1)
- Selected rows
Clearing All Filters
Button: "Clear Filters" in the toolbar
What It Does:
- Removes all active filters
- Resets date ranges
- Clears dropdown selections
- Keeps My Cases toggle and sort order
Common Workflows
Finding a Specific Case
By File Number:
- Type file number in the File Number filter bar
- Case appears instantly
By Patient Name:
- Type patient name in the Patient Name filter bar
- Matching cases appear
By Your Cases Only:
- Toggle My Cases to ON
- See only your assigned cases
Tips & Best Practices
Efficient Case Management
✅ Use My Cases toggle - Focus on your work without distraction
✅ Save common filters - The system remembers your filters between sessions
✅ Sort by Next Activity Date - Prioritize cases with upcoming deadlines
✅ Link companion cases - Maintain relationships between related files
Data Entry Tips
✅ Select Law Firm first - This populates defaults and filters dependent fields
✅ Check auto-calculated fields - Statute of Limitations, Next Activity Date
✅ Use required fields as minimum - Add optional details as available
Grid Performance
✅ Hide unused columns - Improves load time and readability
✅ Use filters instead of scrolling - More efficient than paging through data
✅ Choose appropriate page size - Smaller pages (20-50) load faster
Troubleshooting
Cannot Submit Case File Form
Possible Causes:
- Required fields are missing (look for red asterisks *)
- Invalid data in fields (e.g., future date for Date of Loss)
- Patient information incomplete
Solution:
- Scroll through entire form
- Look for red error messages
- Fill in all required fields marked with *
- Ensure patient section is complete
- Try submitting again
Law Firm Contact/Attorney Dropdown Empty
Cause: No law firm selected yet, or selected law firm has no associated contacts
Solution:
- Select a Law Firm first
- Wait a moment for dropdowns to populate
- If still empty, law firm may not have contacts configured
- Contact support to add contacts to the law firm
Case File Not Appearing in Grid
Possible Causes:
- Active filters excluding the case
- My Cases toggle is ON (and case assigned to someone else)
- Case file creation failed
Solution:
- Click Clear Filters button
- Turn OFF My Cases toggle
- Search by file number in the filter bar
- If still not found, check if creation was successful
Grid Loading Slowly
Causes:
- Large result set (many cases matching filters)
- Too many visible columns
- Large page size
Solution:
- Apply more specific filters to reduce results
- Hide unnecessary columns using Column Chooser
- Reduce page size to 20 or 50
- Sort/filter by indexed columns (File Number, Date)
Form Field Reference
Case File Fields
| Field | Type | Required | Description |
|---|---|---|---|
| File Number | Text | No | Auto-generated unique identifier |
| File Opened | Date | Yes | Date case was opened |
| Date of Loss | Date | Yes | Date of incident/injury |
| Law Firm | Dropdown | Yes | Associated law firm |
| P&L | Dropdown | Yes | Profit & Loss classification |
| Case Manager | Dropdown | Yes | Assigned case manager |
| Law Firm Contact | Dropdown | Yes | Primary law firm contact |
| Record Status | Dropdown | Yes | Current record status |
| Attorney | Dropdown | No | Assigned attorney |
| Case Type | Dropdown | No | Category of case |
| Market Manager | Dropdown | No | Market management assignment |
| In Treatment | Toggle | No | Active treatment status (default: ON) |
| Surgical | Toggle | No | Surgery involvement |
| Statute of Limitations | Date | No | Legal deadline (auto-calculated) |
| Companion Cases | Multi-select | No | Related case files |
| Comments | Text Area | No | Free-text notes |
Patient Fields
| Field | Type | Required | Description |
|---|---|---|---|
| First Name | Text | Yes | Patient's first name |
| Last Name | Text | Yes | Patient's last name |
| Date of Birth | Date | Yes | Patient's DOB |
| Gender | Dropdown | Yes | Patient's gender |
| Phone Number | Text | Yes | Primary contact number |
| Address | Text | Yes | Street address |
| City | Text | Yes | City |
| State | Dropdown | Yes | State |
| Zip Code | Text | Yes | ZIP/Postal code |
| Text | No | Email address | |
| Language | Dropdown | No | Preferred language |
Need Help?
If you encounter issues not covered in this guide:
- Contact CaseCompass support via support@casecompass.com
- Provide specific error messages
- Include screenshots if helpful
Last Updated: November 2025